What if a shoebox-sized machine could carve our ideas into wood, plastic, or even a sliver of aluminum without making our landlord any more suspicious than usual?


Why We Picked the RATTMMOTOR CNC-3018-PRO MAX
We wanted a compact, approachable CNC router we could assemble in an afternoon and use the same evening. The RATTMMOTOR CNC-3018-PRO MAX caught our eye because it promises a straightforward build, a respectable work area for small projects, and GRBL 1.1 control with practical safety features. It looked like the kind of tool that makes a desk feel like a workshop, which to us feels extremely victorious.
We also appreciated that it doesn’t pretend to be an industrial machine. It’s a DIY-friendly, bench-sized router that focuses on woods, plastics, PCBs, and soft metals. If we want to mill a battleship, we’ll need a different hobby, and probably a permit.

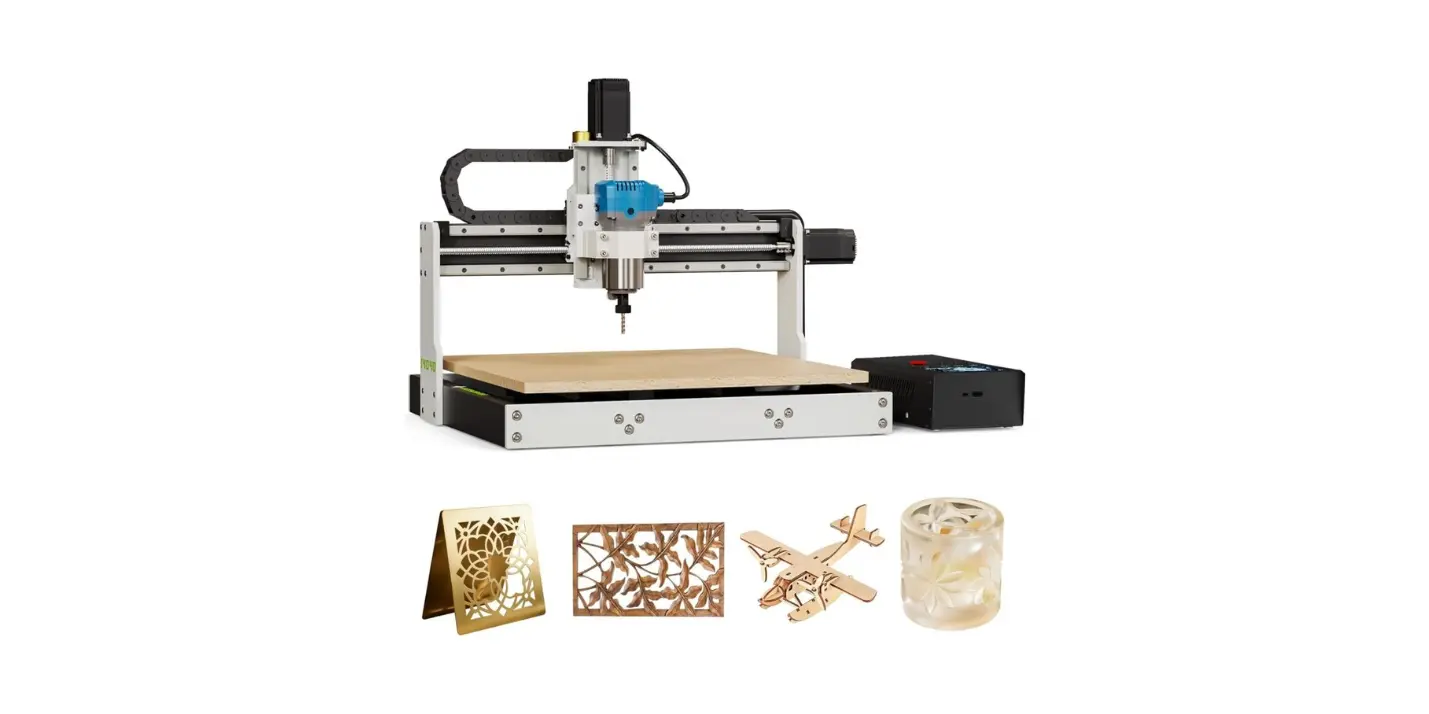
RATTMMOTOR CNC-3018-PRO MAX CNC Router Machine Kit DIY Mini CNC Wood Router Machine 3 Axis GRBL Control Engraver Milling Cutting Machine Working Area 300x180x45mm for Plastic/Wood/Acrylic/PVC/PCB
Unboxing and First Impressions
We opened the box expecting a chaotic puzzle and found a tidy, labeled kit. The frame parts are neatly packed, the aluminum table feels substantial, and the wiring doesn’t look like it was designed by someone who hates us. There’s a paper manual plus a USB drive with drivers, software, and instructions—the small kindnesses that keep us from sobbing into hex keys.
The fixed external frame is injection-molded (black) and the working table is aluminum alloy. The screw rods are stainless steel. That mix of materials strikes a balance between weight, stability, and cost. We’re not dealing with aircraft-grade rigidity, but we also won’t herniate a disk moving it from one end of the table to the other.
Specifications at a Glance
We’ve seen some variations in listed working area across sellers, which we note below. The 3018 family generally refers to 300 mm x 180 mm travel in X and Y. That said, a few spec sheets for this model show a smaller Y dimension. If precision on that measurement matters for a project, we recommend confirming with the seller before hitting “buy.”
| Item | Detail |
|---|---|
| Product | RATTMMOTOR CNC-3018-PRO MAX CNC Router Machine Kit |
| Frame size | 420 x 350 x 270 mm (16.53 x 13.78 x 10.63 in) |
| Typical working area | 300 x 180 x 45 mm (11.8 x 7.1 x 1.8 in) |
| Alternate working area (seen on some listings) | 180 x 100 x 45 mm; confirm with seller |
| Frame material | Black injection-molded outer frame; aluminum alloy worktable |
| Motion | X/Y/Z on lead screws with stainless steel screw rods |
| Spindle | 775 DC motor, 12–24 V; approx. 10,000 RPM at 24 V |
| Stepper motors | 42-size (NEMA 17 class), 12 V; phase current 1.3 A; torque 0.25 N·m |
| Control board | GRBL 1.1 with support for emergency stop, limit switches, probe, offline controller; power switch; silent fan |
| Spindle control capacity | Board supports up to 20,000 RPM spindles (upgrade capacity) |
| Supported materials | Wood, plastic, acrylic, PVC, PCB, carbon fiber (with proper PPE), MDF, and soft metals (copper, aluminum) |
| Not suitable for | Glass, hard metals (e.g., steel), jade, and other very hard materials |
| Typical users | DIYers, makers, hobbyists, students, PCB tinkerers |
We love the GRBL 1.1 compatibility. It means we can use popular, free software tools and take advantage of features like homing, soft limits, and probing. It also makes the learning curve more gentle than it has any right to be.
Assembly: From Bag of Bolts to Working Machine
Assembling the CNC-3018-PRO MAX is like building a moderately complex Swedish bookshelf that happens to cut your coasters. We spent about two to three hours on it, taking time to square the frame and route wires neatly. We’ve assembled worse furniture—and at least this kit rewards us with something that can cut signs, not just hold them.
The instructions are decent, the parts count is manageable, and the included tools are sufficient. That said, we grabbed our own screwdrivers and a small machinist square because we find it soothing to pretend we’re methodical.
- Frame and gantry: The outer injection-molded frame pieces connect first, then the gantry for the X and Z axes. Aligning everything so it’s square is the single best favor we can do for our future selves.
- Lead screws and couplers: We attached the stainless steel lead screws and ensured the couplers are snug. This is not the time to test our strength; overtightening can cause misalignment and lead to binding later.
- Spindle and Z assembly: The 775 spindle motor mounts in front. We checked spindle runout by eye—just spinning a bit and looking for wobble. It’s not a lab-grade spindle, but ours looked true enough for hobby work.
- Wiring: The control board is clearly labeled, and the motor/limit switch leads are keyed. Our only challenge was fitting our own cable management preferences into the available space, which is a very “us” problem.
- E-stop and switches: If our kit includes the emergency stop and limit switches, we mount and wire them now. If not, we plan to add them—they’re worth it for safety and convenience.
Tips That Saved Our Sanity
A little upfront fuss pays off later. We’ve learned this in the kitchen, on bicycles, and now with CNC frames.
- Square the frame: Use a small square to ensure the gantry is truly perpendicular to the bed. Tiny misalignments multiply into chatter and poor surface finish.
- Don’t overtighten into plastic: The outer frame is injection-molded. Snug is good. Heroic is bad.
- Align the Z-axis smoothly: With the lead screw disconnected, slide the Z carriage by hand. It should feel smooth. Bind now, cry later.
- Add a spoilboard: Milling into the stock bed is like cutting on a granite countertop—don’t do it. A sacrificial MDF board transforms workholding and protects the bed.
- Threadlock with restraint: If you use threadlocker, keep it minimal and away from plastic parts.
Firmware and Software: GRBL 1.1 Played Nicely
We’re big fans of GRBL 1.1 for CNC routers. It’s like the universal remote that actually works, and the community support ensures we’re never alone at 2 a.m. when we wonder if $27=1 is the setting that makes homing behave. (It is.)
We used a mix of sender programs, including Candle (aka GrblControl), Universal Gcode Sender (UGS), and OpenBuilds CONTROL. All three recognized the board quickly and were simple to set up. On Windows we installed the CH340 USB driver. On macOS, things “just worked,” which feels unreasonably luxurious.
For CAM, we had success with:
- Easel: Friendly for beginners; easy 2D/2.5D jobs.
- Carbide Create: Great for simple vector-based toolpaths; free and lightweight.
- Fusion 360: More advanced 2.5D strategies; perfect for complex pockets and profiles.
- Inkscape + JSCut/Kiri:Moto: Good for sign-making and engraving tasks.
Setting Up the Controller
A few steps made a big difference to our experience.
- Connect via USB, set baud rate to 115200 in our sender, and confirm GRBL 1.1 reports itself in the console.
- Configure homing if we’ve installed limit switches: $22=1 enables homing, $23 sets homing direction. We used soft limits ($20=1) to prevent unintentional crashes once homing is established.
- Calibrate steps/mm: Default values are usually fine, but we jogged 50 mm and measured actual travel with calipers. If there’s deviation, adjust $100, $101, $102 accordingly so circles aren’t moody ovals.
- Tool probe: If we’re using a probe, confirm $6 and $10 values match our sender’s expectations, and test using a scrap. Watching the bit gently kiss a copper pad never stops feeling futuristic.
Workholding and Tooling: Where the Project Is Won
Workholding is where rookie mistakes go to party. The aluminum table supports T-slots, which we used with T-nuts and clamps. We also topped it with a spoilboard (pre-drilled MDF), letting us sink wood screws anywhere we wanted. It’s amazing how much more confident we feel when we know we won’t hit the aluminum bed.
For delicate materials like PCBs or thin acrylic, we used blue painter’s tape on both the spoilboard and the material with a thin layer of CA glue between. It’s magic. Just don’t tell our lungs we said that.
Bits and collets:
- The spindle uses ER11 collets. We used 1/8″ (3.175 mm) shank end mills for most jobs, along with V-bits for engraving and single-flute end mills for aluminum.
- Sharp tools make this machine feel twice as rigid. Dull tools make it cry, and by “it” we do mean us.
Performance: What We Cut and How It Went
We went into testing with honest expectations. The 775 spindle isn’t a powerhouse; it’s a polite motor that prefers steady work over heroics. We started small, learned the machine’s voice (which sounds like an energetic toothbrush at 10,000 RPM), and found a groove that gave us clean parts with minimal drama.
- Wood (pine, poplar, MDF): It handled 2D profiles and shallow pockets beautifully with 1–2 mm depth of cut and 0.8–1.5 mm stepovers at moderate feed rates. MDF dust gets everywhere, but that’s more of a life issue than a machine issue.
- Plastics (acrylic, PVC, ABS): With the right bit and lighter stepdowns, we got clean edges in acrylic, especially with single-flute cutters. Conventional wisdom says “no rubbing” and we took that to heart—chips or bust.
- PCBs: Isolation routing is where this shines. We used V-bits (20–30 degrees) with shallow passes and ended up with usable boards without chemical etching. Our inner electronics nerd cheered.
- Soft metals (aluminum 6061 and copper): With single-flute cutters and conservative passes (think 0.1–0.3 mm depth), we made small brackets and engraved aluminum plates. You won’t be hogging material, but careful settings gave us tidy results.
Noise, Vibration, and Accuracy
Noise felt about like a hairdryer plus ambition. Not punishing, but we still used hearing protection. Vibration depends heavily on assembly quality; after squaring everything we saw minimal chatter with reasonable feeds and sharp bits.
Accuracy was in the hobby-machine range. After calibration, we achieved around ±0.1–0.2 mm on small parts in wood and plastic. Aluminum demanded more modest expectations, but for nameplates and small pockets, we were pleased. The limiting factors are spindle rigidity and overall frame stiffness—both expected at this size and price.
Surface Finish and Bit Life
For wood and plastics, finishing passes made a world of difference. We cut a little oversize, then did a final 0.2–0.3 mm pass to get crisp profiles. For aluminum, a light finishing pass with plenty of chip clearance was our ticket to a surprisingly nice sheen.
Bit life improved drastically when we respected chip load. We kept flute clear, used a gentle air puff or vacuum, and avoided melting acrylic. For aluminum, a tiny spritz of lubricant helped; we stick to safer options and use a light touch. If we can smell it, we’re using too much.

Starting Settings That Worked for Us
Consider these as starting points, not commandments. Every setup varies, and our bits have their own mysterious preferences. We’d rather you start gentle and adjust upward than break bits like breadsticks.
| Material | Tool | Spindle | Feed rate | Stepdown | Notes |
|---|---|---|---|---|---|
| Pine/Poplar | 2-flute upcut 1/8″ | ~10,000 RPM | 400–700 mm/min | 0.5–1.5 mm | Climb cut finishing pass for clean edges |
| MDF | 2-flute upcut 1/8″ | ~10,000 RPM | 300–600 mm/min | 0.5–1.0 mm | Aggressive dust; use vacuum and mask |
| Acrylic (cast) | Single-flute 1/8″ | ~9,000–10,000 RPM | 200–400 mm/min | 0.3–0.8 mm | Avoid melting; keep chips clearing |
| PVC | Single-flute 1/8″ | ~8,000–10,000 RPM | 200–350 mm/min | 0.3–0.8 mm | Watch for melting; light stepovers |
| PCB (FR-1) | 20–30° V-bit | ~10,000 RPM | 80–150 mm/min | 0.05–0.1 mm | Accurate Z-zero crucial |
| Aluminum 6061 | Single-flute 1/8″ | ~9,000–10,000 RPM | 120–250 mm/min | 0.1–0.3 mm | Very light passes; secure stock firmly |
| Copper | Single-flute 1/8″ | ~8,000–10,000 RPM | 100–200 mm/min | 0.1–0.2 mm | Light, patient, and well-clamped |
If you hear squeal, reduce RPM or increase feed slightly. If chips look like dust, increase feed or depth; if it’s melting, reduce RPM or feed. If nothing helps, take a short break and negotiate with your bit like it’s a houseplant.
Safety and Reliability
The GRBL board supports an emergency stop and limit switches. We wired an e-stop and felt calmer immediately. It’s the seatbelt of CNC—rarely dramatic, always worth it. Homing and soft limits also serve as a safety net, sparing us the uniquely horrible sound of a lead screw trying to push through the end of the world.
Dust and ventilation matter. MDF dust deserves a mask and vacuum, and carbon fiber dust is hazardous; if we cut it at all, we wear a proper respirator and contain the mess. Acrylic can produce unpleasant fumes; ventilation helps. Loose clothing, hair, and jewelry stay away from the spindle. We like our style, but we like our fingers even more.
Reliability-wise, our unit behaved predictably. The silent fan on the control board kept electronics cool, and the power switch made life easy. We recommend checking connections after the first few jobs, retightening as needed, and adding a drop of lightweight oil to the rods and a dab of dry lube to the lead screws every so often.
What We Loved
- Friendly assembly: We built it in an evening without existential despair.
- GRBL 1.1 support: Homing, probing, soft limits—features that lend confidence and reduce wasted stock.
- Versatility: Wood, plastics, PCBs, and soft metals—all on a compact footprint.
- Safety features: E-stop support, limit switches, and clean wiring keep chaos at bay.
- Community and software: Plenty of tutorials and free tools for CAD/CAM and sending g-code.
- Reasonable noise level: Apartment-friendly by hobby standards, with ear protection.
- Upgrade pathway: The controller’s support for higher-RPM spindles means room to grow.
What Gave Us Pause
- Spindle limitations: The 775 motor is fine for light work but lacks torque for aggressive cuts or larger tooling.
- Frame rigidity: The injection-molded frame is practical, but not as stiff as all-aluminum designs.
- Open design: Dust goes everywhere. Consider an enclosure or at least a vacuum shoe.
- Spec variance: We’ve seen conflicting working area dimensions across listings; verify before buying if size is critical.
- Not for hard materials: Steel, glass, and jade are off the table. This is not a surprise, but worth underscoring.
Who This Machine Is For (and Not For)
This is a superb starter CNC for hobbyists who want to make signs, coasters, small enclosures, PCB prototypes, and engraved plates without committing an entire garage. We put it squarely in the “home workshop and classroom” realm, where it shines.
If we’re aiming for heavy aluminum stock removal, long production runs, or steel, we’ll be frustrated. If we want a nearly plug-and-play experience with industrial support and an enclosure, that’s a different budget and a larger footprint. But for the curious builder learning CAM and g-code on tangible projects, it’s a joy.
Upgrades and Accessories Worth Considering
We’re card-carrying tinkerers, so we can’t resist a small upgrade list. Not all are necessary, but each one adds comfort or capability.
- Spoilboard kit: Adds threaded inserts or simple screw holes. Makes workholding painless.
- Better clamps and T-nuts: The included hardware works, but nicer clamps feel like a gift to future projects.
- End mills: A small set of quality 1/8″ tools—2-flute upcut, single-flute, and a V-bit—covers most tasks.
- Touch probe: Speeds up Z-zeroing and adds repeatability, especially for PCBs.
- Limit switches and E-stop: If not included, add them. Safety that also improves workflow.
- Drag chains or cable sleeves: Cleaner wiring, fewer snags.
- Enclosure or dust shoe: Your lungs and carpet will thank you. Also slightly muffles noise.
- Spindle upgrade: The board supports up to 20,000 RPM. Moving to a 52 mm, 300–500 W spindle increases capability, but check mounting and power compatibility—and recognize the frame is still the frame.
Troubleshooting and Maintenance
Most issues we’ve encountered were either user error (we’re only human) or simple mechanical adjustments. Here’s the short list we wish we had taped to the wall from day one.
- Lost steps or slipped position: Reduce feed or acceleration ($120–$122), check couplers, verify stepper connectors are fully seated, and ensure nothing is binding.
- Chatter or rough finish: Tighten frame bolts, square the gantry, reduce stepdown, and do a finishing pass. Check tool sharpness and stick-out—shorter is stiffer.
- Z-axis not returning to height: Verify $102 steps/mm. If it lowers under its own weight, check for slipping couplers or too-low current.
- Burnished acrylic or melted edges: Lower RPM and increase feed slightly; use single-flute bits. Keep chips clearing.
- Inconsistent probing: Make sure the probe clip and pad are clean. Set $10 and $6 to match our sender’s expected report and probe invert settings.
- Limit switch false triggers: Use shielded wires if possible and route motor wires away from switch wires. Adjust debounce settings in software if supported.
Maintenance is simple: wipe down rails, dust the control board, check set screws and couplers, and lightly lubricate. We avoid heavy greases that attract dust; we favor a dry lube or light oil used sparingly.

Example Projects We Tried
We wanted to do a little of everything without carrying emotional baggage into the garage.
- Hardwood nameplate: A piece of maple, a 60° V-bit, and a 0.3 mm finishing pass gave us crisp lettering. We added a chamfer with a small end mill and pretended we were a boutique sign shop.
- Acrylic keychain: Single-flute cutter, conservative feeds, and we left the paper mask on during cutting. The edges came out clear after a quick flame polish. Then we remembered acrylic is flammable and stopped doing that indoors.
- PCB prototype: FR-1 board, 30° V-bit, and a careful Z probe. The traces looked shockingly professional—as if we hadn’t learned electronics from the back of a cereal box.
- Aluminum tag: 6061 plate, single-flute mill, tiny stepdowns at 0.2 mm. The machine took its time but delivered legible, clean engraving. We sanded the surface lightly and felt strangely accomplished.
Comparison: 3018-PRO MAX vs Other 3018s
We’ve used a handful of 3018-class routers and can say the RATTMMOTOR CNC-3018-PRO MAX stands out with a well-thought GRBL 1.1 board and quality-of-life features like e-stop support, probing, and a cooling fan. Many budget boards skip those or bury them in cryptic headers.
Compared to a generic 3018-PRO, the PRO MAX feels more refined in the electronics and often ships with better documentation. Versus a premium kit like the SainSmart 3018-PROVer, this one may require a bit more assembly and lacks an enclosure, but it typically wins on price and keeps pace in capability for typical hobby tasks.
The primary differentiator across the 3018 world is rigidity and spindle power. Upgraded frames and spindles help, but the base design’s sweet spot remains light-duty work. Within that sweet spot, the PRO MAX is a strong contender with a friendly setup experience.
Environmental and Space Considerations
We ran ours on a sturdy table with a cutting mat underneath. The footprint is small enough for an apartment office or a corner of a classroom, though we suggest an enclosure if we share the space. A shop vac with a HEPA bag helps, and ear protection makes longer runs more pleasant.
Power draw is modest: a 24 V supply for the steppers and spindle is typical, and we didn’t trip any breakers. The biggest environmental villain is dust. Keep the vacuum handy and don’t ignore masks; MDF and carbon fiber in particular deserve respect.
Buying Advice and Checklist
Before we add to cart, we scan this checklist to keep surprises to a minimum.
- Confirm working area: Most 3018 machines are 300 x 180 x 45 mm, but we’ve seen this listing note 180 x 100 x 45 mm. Ask the seller if it matters for your project.
- Check what’s included: Offline controller? Limit switches? E-stop button? Probe? These vary by kit and bundle.
- Verify voltage and plug type: The spindle runs on the included 24 V supply; confirm it matches your region.
- Inventory hardware: Open and verify small parts on arrival. It’s easier to exchange early than mid-build.
- Plan basic tooling: A few 1/8″ cutters, clamps, and a spoilboard will make day one more fun.
- Read the manual on the USB drive: We know, but it actually saves time.
Everyday Use and Workflow
Our typical session goes like this: design in CAD/CAM, post g-code, clamp stock, home the machine, probe Z, and run a short air-cut to confirm nothing collides. We keep a “pre-flight” checklist on a sticky note. It makes us look serious and also prevents us from carving beautiful letters into our clamps (again).
Job times vary. PCB isolation might take 20–40 minutes; a dense aluminum engraving can be an hour or more. While it runs, we hang around to vacuum chips and pretend we’re supervising something complicated, which technically we are.
The Learning Curve (and How We Softened It)
We learned quickly by starting with simple rectangles, pockets, and text. Let the machine teach us what it likes. Two-flute upcuts for wood, single-flute for plastics and aluminum, and shallow passes for almost everything. The difference between “this works” and “this is pleasant” came down to finishing passes and careful Z-zeroing.
We saved our GRBL settings to a text file and kept our CAM post-processor consistent. We also labeled our bits like proud librarians. The day we stopped guessing which end mill we were holding, things improved.
Little Luxuries That Made a Big Difference
- LED light strip: Seeing clearly while setting Z and checking chips was a quiet joy.
- Small brush and dental picks: Perfect for clearing chips from tight corners.
- Calipers: We measured, then we measured again. Calipers are the truth.
- Painter’s tape and CA glue: Workholding magic for thin stock and PCBs.
- Rubber feet or foam pad under the machine: Less vibration, less noise transmitted to the table.
What We’d Change If We Could
If we could wave a magic (non-OSHA-approved) wand, we’d bump the rigidity of the Z axis and add a slightly more powerful, quieter spindle out of the box. We’d also standardize the listed working area across all product pages to avoid confusion. Those tweaks would nudge the machine from “very good for beginners” toward “surprisingly capable for its size.”
The Quirks That Made Us Smile
We swear the 775 spindle has a personality. It hums cheerfully through pine, clears its throat in acrylic, and speaks in careful syllables in aluminum. When we get greedy, it reminds us to slow down. In a way, it turned us into better machinists by forcing us to listen and adjust. There’s something endearing about a tool that teaches patience without breaking the bank.
Support, Documentation, and Community
The included manual and USB drive covered drivers and basic setup. For everything else, the 3018 community online is vast and kind. We found GRBL parameter cheatsheets, feeds-and-speeds charts, and videos that made us feel unusually competent. That ecosystem is half the value. No one’s alone in 3018-land unless they choose to be.
If we needed replacement parts, generic 3018 spares are widely available. Standard ER11 collets, 775 spindles, stepper motors, and even entire control boards are easy to source. It’s a comfort knowing a mistake isn’t fatal to the whole setup.
Value for Money
Given its capabilities, included features, and the GRBL 1.1 control board, the RATTMMOTOR CNC-3018-PRO MAX is solid value. It brings CNC routing into small spaces at a price that leaves room for end mills and a decent vacuum. If we’re happy cutting in wood, plastics, PCBs, and cautiously in soft metals, it’s hard to argue with.
Spending more gets us better rigidity, more power, and sometimes an enclosure. Spending less can mean questionable electronics and unclear documentation. This one hits the sweet spot: capable out of the box, expandable with upgrades, and generous with safety features.
Final Verdict
The RATTMMOTOR CNC-3018-PRO MAX CNC Router Machine Kit does exactly what we hoped a hobby-class CNC would do: it lets us turn sketches into tangible projects on a weekday evening. We assembled it without drama, configured GRBL 1.1 with confidence, and produced clean parts in wood, plastics, PCBs, and simple aluminum jobs. The e-stop, limit switch support, probing, and cooling fan on the controller bring grown-up features to a beginner-friendly package.
Its limitations are honest—modest spindle power, non-industrial rigidity, and an open frame that prefers gentle passes and good dust control. Within those boundaries, it’s a reliable, enjoyable tool that rewards patience and good technique.
If what we want is a compact CNC that fits our desk, fits our budget, and fits our learning curve, we can happily recommend it. We’re giving it a confident 4 out of 5 for hobby use, with extra credit for the thoughtful control board and the approachable build. And if someone asks whether a small machine can make big smiles, we’ll point to our keychains, nameplates, and PCBs and say, “Yes—just don’t forget the spoilboard.”
Disclosure: As an Amazon Associate, I earn from qualifying purchases.