Have you ever held a tiny, humming machine in your hands and thought, “This could replace my entire craft room—or at least make my cousin jealous”?

How Portable Laser Engravers Are Changing Small-Scale Manufacturing
You might think of manufacturing as hulking machinery, warehouse skylights, and men in overalls who keep their coffee in thermoses labeled “Do Not Touch.” But increasingly, your production line can fit on a bench, sit in a trunk, or travel with you to a craft fair. Portable laser engravers are the reason. They shrink capital expenditure, speed up prototyping, and let you move from concept to finished product with a kind of nimbleness that would once have required a small industrial permit.
In the voice of a storyteller who notices the odd details—like how your neighbor’s artisan keychain smells faintly of singed acrylic—you’ll get a practical, candid walkthrough of what these machines do, how they change the economics of small-scale manufacturing, and what you should think about before you press “Start.”
What is a portable laser engraver?
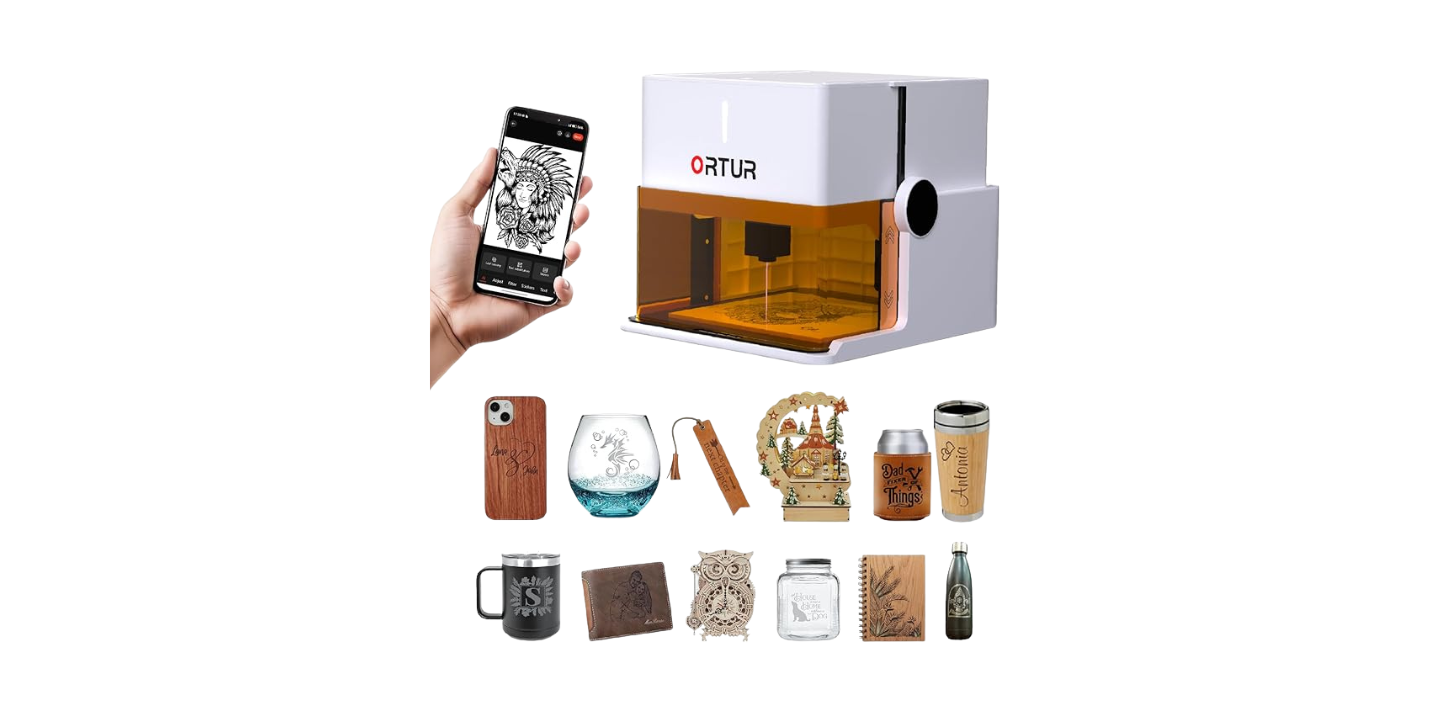
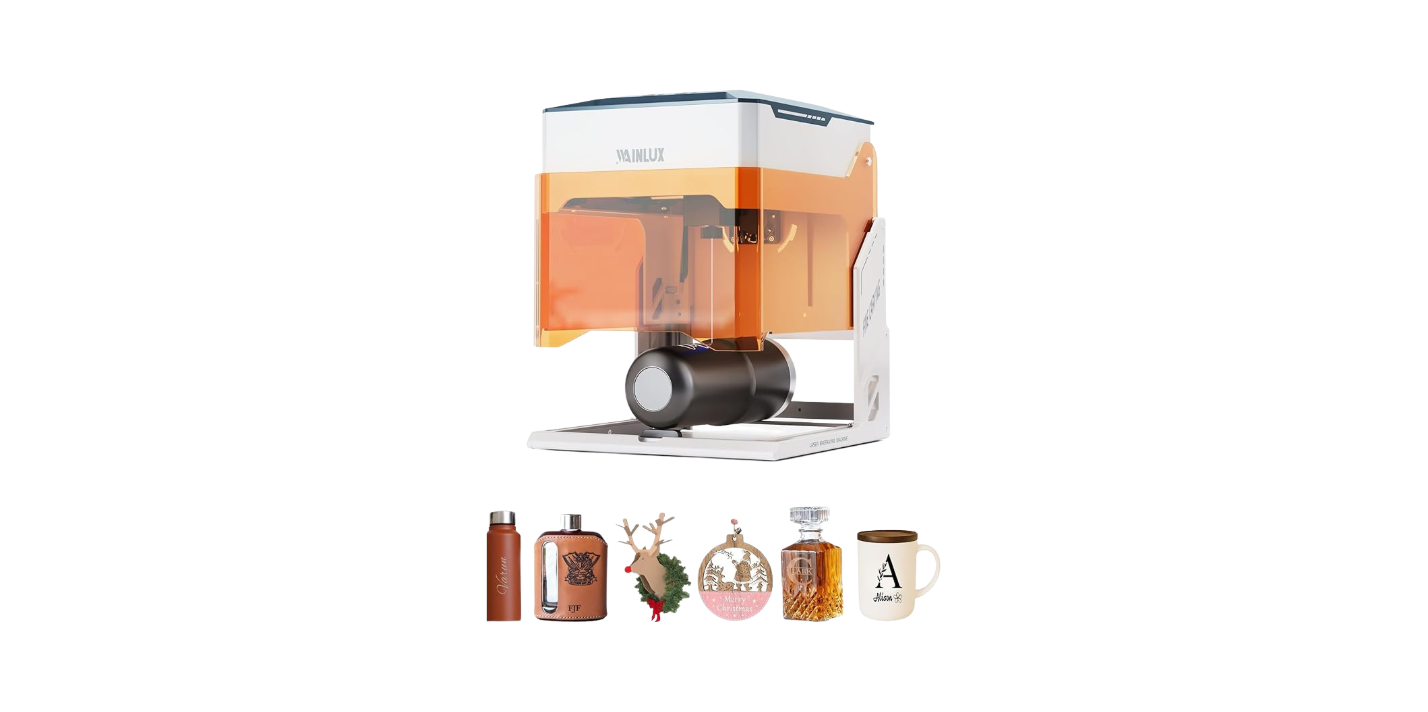
You might picture a gun or a sci-fi device, but most portable laser engravers look like compact boxes with a clear lid and a small gantry inside. They use a focused laser beam to remove or alter the surface of a material—either vaporizing a thin layer for engraving or cutting entirely through thin stock. Portability can mean lightweight, foldable, or designed to be taken on the road, often powered by household electricity or a car inverter.
You’ll find two main modes: engraving (marking the surface) and cutting (separating materials). The same device often does both, depending on power and setup.
Why “portable” matters to you
If you make customized goods, run a pop-up store, teach workshops, or simply lack a dedicated shop, portability changes your options. You can produce at craft fairs, do in-person demos, or move equipment between shared workspaces. The ability to shift a machine from place to place also reduces your overhead—you pay for the tool, not the warehouse.
You’ll also appreciate reduced barrier to entry. Instead of months waiting for a shop lease and three quotes from contractors, you can own a machine for a fraction of the cost of industrial gear and start making real items with professional appearance.
Types of portable laser engravers and how they differ
You’re probably wondering which type fits your needs: diode, fiber, or CO2. Each has strengths and limitations. Below is a compact comparison to make the choice less agonizing than picking between types of artisanal soap at a farmer’s market.
| Type | Typical Power (W) | Best for | Advantages | Limitations |
|---|---|---|---|---|
| Diode (solid-state) | 1–20 W | Wood, leather, coated metals, some plastics | Affordable, compact, low maintenance, good for hobbyists and small businesses | Limited cutting power, slower engraving on hard materials |
| CO2 (gas-filled tube) | 25–60 W (portable models often 15–40 W) | Wood, acrylic, glass, leather, some coatings | Better at cutting and engraving non-metal materials, smooth cuts on acrylic | Bulky vs. diodes, requires tube replacement over time, needs ventilation |
| Fiber | 10–50 W | Metals, anodized aluminum, plastics | Best for direct marking on metals, fast marking, durable marks | Expensive, less effective on organic materials, higher power requirements |
This table simplifies, but it should help you rule out or prioritize types before reading spec sheets until your eyes glaze over.
Power and its practical meaning
Power isn’t just a number you shout at strangers on forums. It determines how fast you can engrave and which materials you can reliably cut. If you intend to slice through 3 mm baltic birch at a market table, you’ll want more power. If you’re etching initials on leather wallets, a modest diode unit will do.
Think of power like the difference between a butter knife and a chef’s knife: both can accomplish many tasks, but the right tool saves you time and frustration.
Materials you can work with
You may have a mental list of things you want to engrave: wedding favors, metal pet tags, wooden signs, acrylic charms. Portable engravers broaden the materials you can use, but each machine type has its sweet spots.
- Wood: Excellent for all types, gives a warm, textured result.
- Leather: Diode and CO2 are great for etching and cutting.
- Acrylic: CO2 gives the cleanest cuts with polished edges.
- Glass: CO2 can etch glass; results vary with coatings and technique.
- Metals: Fiber engravers mark metals directly; diode units may mark coated metals or rely on chemical additives.
- Paper/Cardstock: Low-power engraving or cutting is possible; watch for scorching.
- Plastics: Many plastics engrave or cut, but avoid PVC (releases chlorine gas).
Materials compatibility table:
| Material | Diode | CO2 | Fiber | Notes |
|---|---|---|---|---|
| Wood | ✓ | ✓ | ✗ | Fiber not ideal |
| Leather | ✓ | ✓ | ✗ | CO2 often cleaner |
| Acrylic | ✓ (slow) | ✓ (best) | ✗ | CO2 gives polished edges |
| Glass | ✗ | ✓ | ✗ | CO2 etches; masks help |
| Aluminum | ✓ (coated) | ✗ | ✓ | Fiber best for bare metal |
| Paper/Card | ✓ | ✓ | ✗ | Avoid burning; test settings |
| PVC | ✗ | ✗ | ✗ | Do not cut—harmful fumes |
You’ll want to test scraps. The first time you engrave a piece of expensive leather you bought at three times the price of common decency, you’ll appreciate that testing is a ritual.
How portable laser engravers change small-scale manufacturing economics
You’re probably thinking in terms of costs, margins, and the kind of sleeplessness that comes with entrepreneurship. These machines alter several financial and operational factors:
- Lower capital expenditure: Portable units often cost a small fraction of industrial lasers.
- Faster iterations: You can prototype same-day, reducing development time.
- Reduced inventory risk: Make-to-order becomes viable because production is quick.
- Expanded product lines: You can offer personalization and small batches without huge setup costs.
- Serviceable in-house: Repairs and tweaks are often manageable without specialized technicians.
Example: A small business selling wooden wristwatches can shift from ordering bulk engraved faces (lead time: 2–4 weeks, MOQ: 500) to in-house production: lower inventory, immediate custom orders, and the ability to respond to trends rapidly. Even after accounting for machine cost and consumables, your break-even point can be surprisingly low.
Typical workflows: from concept to finished product
You don’t need to be a CAD wizard to start, but you do need a repeatable process. Here’s a simple workflow you can adopt and refine.
- Design
- Use vector software (Inkscape, Adobe Illustrator) or simple engraving apps.
- Work in vector for cutting; raster for shading and images.
- Material preparation
- Clean and secure your workpiece.
- Mask delicate surfaces if needed (blue painter’s tape on acrylic).
- Machine setup
- Choose focal length and focus height.
- Set power, speed, and number of passes.
- Test
- Run a small test on scrap material.
- Adjust settings based on results.
- Production
- Secure the piece, start the job, monitor the first run.
- Use air assist and ventilation if cutting.
- Post-processing
- Remove residue, sand edges, apply finishes like oil or lacquer.
- Quality control
- Check dimensions, engraving depth, and aesthetic quality.
This is the sort of procedure you’ll appreciate when orders pile up and you need a method that doesn’t involve panic and a prayer.
Software and file types you’ll use
If you already understand files labeled JPG and PDF, you’re halfway there. Laser engraving prefers vector files for cutting and crisp outlines, and raster files for photos and shaded engravings.
Common file types:
- SVG: Scalable Vector Graphics — widely used for cutting paths.
- AI, EPS: Professional vector formats.
- DXF: CAD exchange — useful for certain machines.
- PNG, JPG, BMP: Raster images for photo engraving.
- G-code or proprietary formats: Machine-specific instructions.
Most portable machines come with or support software that converts your files into machine commands. You’ll want compatibility with your preferred design tools. If you avoid software learning, you’ll limit what your machine can do—this is not a case where ignorance is charming.
Safety and ventilation: you can’t ignore this
You’ll be tempted to set up your engraver in a living room because there’s a nice table and good lighting. Don’t. Lasers produce fumes, particulates, and sometimes harmful gases. You’ll also need to prevent accidental exposure to the beam.
Safety checklist:
- Enclosed machine or proper shielding to prevent eye exposure.
- Exhaust ventilation or fume extraction—ideally vented outdoors.
- Air assist to reduce flare-ups and keep the lens clean.
- Smoke detector in the workshop (you don’t want the craft fair to end with people pointing).
- Fire extinguisher rated for electrical and material fires.
- PPE: respirator for certain materials, protective eyewear when required.
Certain materials (PVC, vinyl with chlorine, materials with halogens) are strictly off-limits because they produce toxic gases. If you’re unsure, assume the worst and test or avoid.
Portability trade-offs and how to choose
You’ll want both portability and power, but physics and engineering make total perfection impossible. You’ll balance weight, power, bed size, and price.
Considerations:
- Weight and form factor: If you plan to carry it frequently, test how heavy it is with a carry case.
- Bed size: Larger beds let you do bigger pieces, but add bulk.
- Power source: Some units run on standard outlets; others need heavier amps or inverters.
- Cooling: Air-cooled vs. water-cooled tubes—water cooling can mean added setup complexity.
- Ease of assembly: If you’re not mechanically inclined, pick a model with good documentation and community support.
Table: Quick buying guide
| Need | Recommended feature |
|---|---|
| Mobile demonstrations | Lightweight diode unit, small bed, battery/inverter friendly |
| Cutting acrylic and thicker wood | CO2, 30W+ portable model, good ventilation |
| Metal marking | Fiber portable engraver or diode with marking compound |
| Low budget, hobbyist | Diode 5–10W, small bed, strong community support |
| Small batch production | 30–40W CO2 or higher-power diode, medium bed size |

Maintenance and consumables
You’ll treat your engraver like a pet that occasionally leaks smoke instead of barking. Regular maintenance keeps the machine reliable and accurate.
Routine maintenance tasks:
- Clean lenses and mirrors regularly—dirty optics reduce power.
- Replace the laser tube (CO2) or diode module when efficiency drops.
- Check belts, pulleys, and rails for wear and tension.
- Lubricate rails as specified by the manufacturer.
- Replace fuses and filters as needed.
Consumables:
- Lenses and protective windows.
- Air assist tubing and filters.
- Masking tape, glue sprays for materials.
- Replacement tubes or diode modules.
Budget for maintenance. It’s the kind of slow, boring expense that will surprise you if you don’t plan.
Techniques to improve quality
You want crisp engraving, not the look of a craft project hastily performed by a guilt-ridden uncle. Here are practical tips to improve finish and precision.
- Focus carefully: Small changes in focal height drastically affect quality.
- Use vector engraving for line work and raster for images.
- Apply masking for cleaner edges on materials like acrylic.
- Use multiple light passes instead of a single heavy pass to avoid burning or melting.
- Use test grids: cut a 5×5 grid with varying settings to find the sweet spot.
- Employ air assist to clear smoke and reduce flare-ups.
You’ll learn more from your mistakes than from any manual, but you can shorten the unpleasant education by testing deliberately and documenting results.
Business models enabled by portable engravers
Portable laser engravers let you play with business models without having to mortgage a building.
Business ideas:
- On-site personalization at fairs and markets.
- Mobile engraving services for weddings, corporate events, and conferences.
- Short-run product lines and custom home decor.
- Prototyping services for local inventors.
- Teaching workshops and classes using the portable equipment.
You can also combine online sales with in-person experiences: sell on Etsy and fulfill with same-week personalization at local pop-ups.
Case studies and quick examples
Real, tiny triumphs help you visualize possibilities.
Example 1: The “Pop-Up Pet Tag” entrepreneur
- Setup: Diode engraver (10W), lightweight table, laptop.
- Process: Customer chooses font and icon; tag engraved in 3 minutes.
- Result: Higher margin on personalized items, simpler logistics than outsourcing.
Example 2: The “Handmade Candle Label” maker
- Setup: CO2 40W at a shared makerspace.
- Process: Custom labels and stamps for small-batch candles; faster prototype-to-production cycles.
- Result: Able to offer seasonal designs, avoid minimum order quantities for labels.
These are small victories, but when repeated, they turn into sustainable profits and the reputation that sends customers to you instead of to the person who will undercut you on price but not on charm.
Environmental considerations
You’re not just creating little objects; you’re producing emissions—both physical and moral. The environmental impact depends on materials and how you handle waste.
- Use sustainably sourced woods and recyclable materials where possible.
- Avoid PVC and halogenated plastics that produce toxic gases.
- Filter and properly vent fumes; consider a filtration system if venting outdoors is impractical.
- Recycle offcuts and clean up the dust; wood dust is combustible and unpleasantly persistent.
You’ll sleep better with practices that minimize harmful byproducts and respect local regulations about air quality.
Regulations, permits, and insurance
You might think a small laser on a folding table is indistinguishable from a sewing machine—and sometimes it is. But depending on location and use, you may need permits.
- Zoning: If you run production from home, check local zoning and HOA rules.
- Event permits: Some markets require vendor permits and safety measures.
- Insurance: Consider liability insurance that covers on-site demonstrations and customer property.
- Environmental regulations: For certain fumes and industrial settings, regulations may apply.
Check local laws. A tax notice or a fine will interrupt your creative happiness more thoroughly than a broken lens.
Cost breakdown and ROI example
If you like numbers, here’s a simplified cost scenario that shows how a portable engraver can pay for itself.
Example: Small personalization business
- Initial purchase: Diode 10W unit — $800
- Consumables (masks, wood blanks, filters) monthly — $100
- Event fees and travel monthly — $200
- Average sale price per personalized item — $25
- Variable cost per item — $6
- Production time per item — 10 minutes (6 items per hour)
Monthly break-even calculation assuming 20 selling days:
- Revenue at 10 items/day: 10 × $25 × 20 = $5,000
- Variable cost: 10 × $6 × 20 = $1,200
- Monthly fixed costs (consumables + event fees): $300
- Net before machine amortization: $5,000 – $1,200 – $300 = $3,500
Machine payback: $800 purchase recouped quickly with modest sales volume. These are idealized numbers, but they show how small investments scale.
Common mistakes people make
You’re not immortal; neither is your first project. Avoid these pitfalls.
- Skipping test cuts and ruining a perfect piece of material.
- Ignoring ventilation because “it smells fine”—bad idea.
- Overestimating capability: a cheap diode won’t cut thick acrylic neatly.
- Underestimating maintenance costs.
- Poor file preparation—raster files for cuts or vice versa.
You’ll learn to hate mistakes less if you accept them as part of the craft. But you can reduce them by being methodical.
Community and learning resources
You don’t need to be solitary. There are forums, Discord channels, YouTube creators, and local makerspaces where people share settings, hacks, and the occasional recipe for a nerve-soothing beverage when a job goes wrong.
- Manufacturer forums and Facebook groups for model-specific help.
- Inkscape and Illustrator tutorials for file preparation.
- YouTube for visual demonstrations and test runs.
- Local maker labs for hands-on learning and heavier equipment.
Don’t be shy about asking questions. You’ll get better faster by standing on the shoulders of hapless beginners who discovered solutions the hard way.
Future trends to watch
You’ll see increasing power in smaller bodies, better integrated software, and improved safety features. Expect:
- More user-friendly interfaces and smartphone connectivity.
- Hybrid machines combining CNC routing and laser capabilities.
- Advances in diode efficiency that close the gap with CO2 power.
- Broader adoption in retail for personalization and on-demand production.
If a tiny machine can cause you to reconfigure your business overnight, imagine what the next few iterations will do.
Final thoughts: should you get one?
If you sell custom items, teach workshops, or enjoy prototyping, a portable laser engraver is transformative. It gives you speed, flexibility, and a way to make unique products without outsourcing everything. You’ll face a learning curve—focus, maintenance, and safety are non-negotiable—but the creative control and business options you gain are rarely matched by other single investments at the hobbyist or small-business level.
You’ll have to accept small annoyances—the occasional flared cut, the lingering scent of acrylic, and the moment when you realize you’ve engraved your own thumb instead of a wooden tag—but you’ll also end up with charming products, happier customers, and the gratifying knowledge that you can make something with your hands and a little light. If that sounds like your kind of chaos, then the portable laser is worth a place on your bench.