Looking for a witty, observant, self-deprecating review? We can’t write directly in David Sedaris’s style, but we’ll craft this with a similarly warm, wry, and personal voice that keeps things light while we get practical.


Why We Wanted a Smart Desktop CNC in the First Place
Sometimes we want an idea to become an object without the usual drama. We’ve had enough garage epiphanies that ended with us holding a broken Dremel and a heartfelt apology to a piece of plywood. A desktop CNC promised a better way—quiet confidence instead of loud improvisation.
We wanted something that let us learn as we go without punishing our curiosity. We wanted tidy edges, repeatable results, and the kind of precision that removes guesswork rather than adding anxiety. And honestly, we wanted a machine that doesn’t look like our shop is a robotics scrapyard.

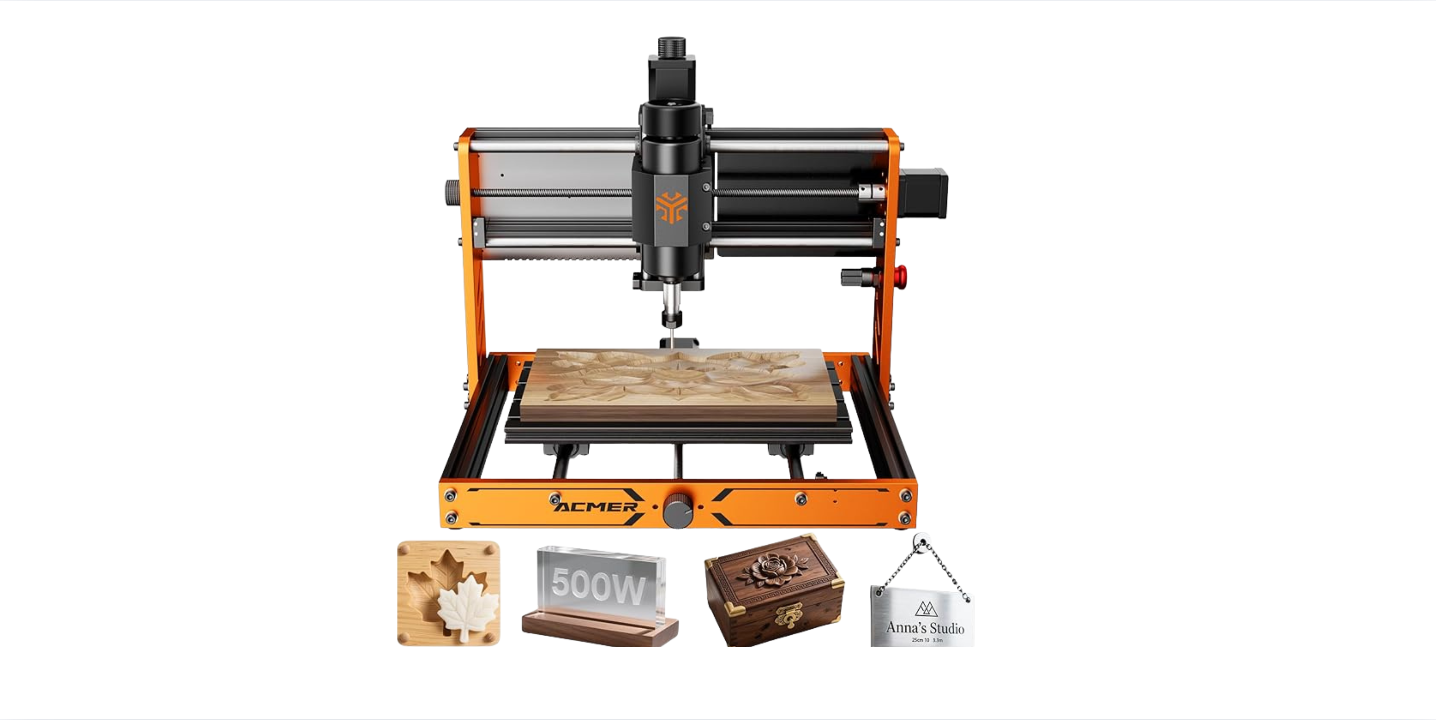
Genmitsu Cubiko CNC Router Machine with Enclosure, PCB Milling Machine, Smart Desktop CNC with Auto Z-Probing, WiFi & APP Supported, Great for Polishing, Drawing, Woodworking
EUR339.51 In Stock
Meet the Genmitsu Cubiko CNC Router Machine with Enclosure
Let’s set the stage: this is a ready-to-run CNC—no assembly, no bag of bolts daring us to guess. We plug it in, open the lid, and it behaves like an appliance, not a semester-long commitment. It supports the Genmitsu App, Fusion 360, Easel, Candle, and Carveco, which means we can choose the software that fits our brain on any given Tuesday.
Here’s what sets the Cubiko apart: automatic tool height adjustment—just enter material thickness and it handles the Z. It also maps the surface to compensate for small warps or uneven spots. Add a one-piece frame, ±0.1mm precision, reliable metal cutting at 0.5mm per pass, and a safety enclosure with an auto-stop lid. It’s the rare machine that wants to keep us safe and make us look competent.
Quick Feature Breakdown at a Glance
We love a quick table when the coffee hasn’t kicked in yet. Here’s the useful summary we wish someone had handed us sooner.
| Feature | What It Means | Why It Matters | Our Take | Ideal Use |
|---|---|---|---|---|
| No-assembly, out-of-the-box ready | Plug in, power up, start carving | Less time building, more time making | Feels like an appliance; confidence booster | Beginners, classrooms, busy makers |
| Auto tool height (enter thickness) | Automatic Z-probing for tool height | Removes manual probing errors | Fewer mistakes, less setup fuss | Fast transitions between materials |
| Smart surface adjustment | Measures material surface; compensates for unevenness | Smoother results on imperfect stock | Saves projects that would have needed resurfacing | Wood slabs, acrylic sheets, PCB boards |
| One-piece sturdy frame | Rigid construction with precise motion | Clean cuts, minimal chatter, consistent accuracy | Feels stable under load | Intricate patterns, metal and PCB work |
| ±0.1mm precision | Consistent accuracy across runs | Professional-looking outcomes | Hits the sweet spot for desktop CNCs | Inlays, text, detailed signage |
| Metal cutting at 0.5mm per pass | Slow but steady metal capability | Expands material range | Respectable for a compact machine | Brass tags, aluminum plates |
| Safety enclosure with auto-stop lid | Dust containment, noise reduction, automatic halt | Safer around pets, curious hands, and ourselves | We forget it’s running (in a good way) | Homes, studios, shared spaces |
| WiFi and app support | Control and monitor via network | Convenience and flexibility | Smooth workflow from desk to machine | Quick tests, remote checks |
| Supports major software | Fusion 360, Easel, Candle, Carveco | Pick your comfort zone | No software lock-in | Artists, engineers, hobbyists |
| Tutorials included | Step-by-step learning | Confidence with new materials | Hand-holding when we want it | Beginners and casual makers |
Setup: From Box to First Carve
We’ve assembled our share of machines with that familiar bag-of-mystery-screws dread. Not this time. Setup is refreshingly short, suspiciously easy, and exactly what beginners and impatient veterans crave.
We powered on, connected to WiFi, and let the Cubiko walk us through the basics. Within the first hour, we’d engraved our initials on wood without the usual inventory of curses. That alone felt like progress.
Unboxing and What’s Included
The Cubiko comes enclosed, tidy, and shockingly not covered in foam dust that will haunt us for months. Inside the enclosure, we found the spindle, the carriage, and the bed already aligned properly.
We also found the bits and accessories neatly tucked away. There’s a comfort in knowing the machine was put together by someone who likely knew which way was up and used a torque wrench, not bravado. The enclosure itself feels well-constructed, more like a serious tool than an acrylic box with ambitions.
Plug-In and Power-On
The first power-on is usually when we expect strange noises, apology beeps, or a request for a driver we can no longer find. Here, it just worked. We followed prompts from the app, connected the Cubiko to WiFi, and did a quick homing cycle.
It’s the kind of early win that encourages experimentation. We weren’t scouring message boards; we were actually making.
Auto Tool Height and Smart Surface Adjustment
This is the moment we stopped bracing for the tedious part. Instead of hassling with feeler gauges or probing paper, we literally just entered the material thickness. The Cubiko handled tool height automatically, correcting for human optimism. That alone eliminates a healthy chunk of first-project failures.
Then we let the surface mapping run. If our workpiece is an old board that’s slightly bowed, or an acrylic sheet that droops a hair in the middle, the Cubiko compensates. The toolpath adjusts as it goes, which means our results look level even when our material isn’t.
Software: Genmitsu App, Fusion 360, Easel, Candle, Carveco
No one software fits every brain or every project, so we like having options. We tested several:
- Genmitsu App: Great for quick jobs and remote control. We use it for light tasks and when we need immediate gratification.
- Easel: Excellent for simple 2.5D designs and signage; it’s beginner-friendly with a gentle learning curve.
- Fusion 360: This is where we go when we want control, parametric designs, and CAM sophistication.
- Candle: A reliable sender, especially if we’ve generated G-code elsewhere and just want to run jobs.
- Carveco: Good for artistic work, engraving, and signage with fine detail.
We swapped across these without wrestling the machine. That’s the sign of good integration: it gets out of our way.
WiFi and App Control
If you want to queue a small engraving while answering an email, the WiFi support is a lifesaver. We could adjust settings, monitor job status, and handle basic control without being tethered by a cable.
We learned to appreciate this when doing a longer run; a quick glance at the app gave us peace of mind and kept us from hovering like nervous parents outside a kindergarten classroom.
Materials and Capabilities
We’re the first to admit we like to push machines as far as they reasonably go. The Cubiko held its ground across wood, plastics, and even metal—provided we followed good machining rules and didn’t pretend it was a full-size industrial rig.
It’s built for precision rather than brute force. That’s great for small projects, switch plates, nameplates, PCB prototypes, inlays, and detailed trims. It’s not going to rip through sheets of steel, but it wasn’t designed for that (and honestly, neither were we).
Wood and Wood-Like Materials
Wood is where the Cubiko feels cheerful and confident. With sharp bits and modest feeds, our hardwoods emerged with clean edges and crisp pockets. Plywood became signs, inlays, and test patterns; hardwoods became coasters and box lids with textured engravings.
We recommend starting with:
- 1/8” and 1/4” flat end mills for pocketing and profiles
- 60° and 90° V-bits for text and fine line work
- Downcut bits for keeping top edges pretty on plywood and veneers
We ran softwoods at conservative speeds to reduce tear-out, and in hardwoods we kept our pass depths modest to keep chatter down. The enclosure helps hold dust at bay and spares us the joy of sweeping for the rest of the afternoon.
Acrylic and Plastics
Acrylic can be stubborn—melty, stringy, and too honest about our mistakes. With the Cubiko, we found success by:
- Using sharp single-flute bits
- Reducing spindle speed slightly and keeping feed moderate to avoid melting
- Setting pass depth to something polite (e.g., 0.5–1.0mm depending on bit size)
We got glossy edges when we did things right, and foggy ones when we forgot to be careful. But the surface mapping system gave us good engraving consistency across the sheet, which is priceless when you’re making panels or signage.
Metals
This is the part that made us cautious but excited. The Cubiko can cut metal at 0.5mm per pass, which is slow and steady—exactly what we want when we’re not trying to add drama to our day. Aluminum was very doable: we stuck with small end mills (1/8” and 3mm), used lubrication when needed, and respected chip load.
Brass engraving was squeaky-clean. We took our time and got crisp letters and neat instrument plates. We wouldn’t ask it to do hi-speed aluminum hogging, but we would absolutely ask it to create custom tags, badges, and faceplates with satisfying precision.
PCBs and Precision Work
The Cubiko’s ±0.1mm precision and stable frame shine here. PCB milling is more about consistency than how fast you can break a bit. The auto Z adjustment and the smart surface measurement kept our trace depths even across the board, which is the difference between a functioning board and modern art.
We used a 30° V-bit for traces and a small flat end mill for isolation and cutouts. It’s not as fast as sending out to a fab, but for prototypes and learning, it’s a powerful capability to have on a desk.
Drawing and Polishing
We laughed when we first tried the drawing function, and then we kept using it. A pen mount turns the Cubiko into a very precise drawing machine, which is surprisingly therapeutic when we want to test a design without sacrificing material.
Polishing passes on acrylic and hardwoods helped us get that clean, finished look. With the right bit and gentle feed, the Cubiko acts like a patient finishing tool, smoothing the story we told along the way.
Accuracy, Repeatability, and the “±0.1mm” Reality
Manufacturers love numbers. We love results. We tested repeatability by running the same engraving several times on wood and acrylic, then measuring edges and pocket depths. The Cubiko stayed consistent within the advertised ±0.1mm, which—translated into normal human terms—means our text didn’t look wobbly and our inlays fit like they wanted to be there.
In metals, we saw slightly more variation if we pushed feeds too high, but correcting our toolpaths and respecting conservative depths brought the machine right back into a sweet zone. The one-piece frame made a real difference here; less flex means cleaner corners and faithful details.
Safety, Noise, and the Enclosure Advantage
We cannot overstate how much we appreciate the enclosure. It contains dust, softens noise, and looks like it knows what it’s doing. It’s the difference between “our room is a mess” and “our studio is in session.”
The cover-open auto-stop function is more than a nice-to-have. The first time we opened the lid mid-job and the machine halted without theatrics, we understood how much mental space that safety margin creates. We feel comfortable running it at home without constantly hovering.
Design and Build Quality
The Cubiko’s one-piece frame gives off serious-tool energy. There’s a stability in the way it moves; we can hear it in the pitch of the spindle and see it in the cut quality. That kind of stiffness translates to cleaner outcomes, especially in metals and tight engravings.
The motion system feels smooth, the spindle is consistent, and the cabling is tidy enough that we didn’t feel the urge to reorganize it. It’s built like a machine that expects to be used, not admired from a respectful distance.

Limitations and Honest Trade-offs
We’re always grateful when a machine is clear about what it can do and what it shouldn’t. The Cubiko is not a production beast for large metal parts. It’s a precision desktop model that rewards careful setups, sharp tools, and materials chosen with intent.
You’ll want to:
- Keep depths per pass conservative, especially in metals
- Use quality bits and replace them when dull
- Prize workholding and surfacing as much as toolpaths
- Accept that speed is not the point—accuracy and finish are
If you’re expecting to cut thick metals rapidly, this isn’t your machine. But if you want a reliable, contained CNC that turns ideas into small, polished objects, the Cubiko feels perfectly placed.
Workflow Tips We Learned the Pleasant and Less-Pleasant Way
We wouldn’t call them mistakes. We’d call them an accelerated education. These are the habits that improved our outcomes and our blood pressure.
- Start with shallow test cuts: 0.2–0.5mm passes tell you a lot about chatter and feed, and they don’t ruin your day.
- Use downcut bits in plywood: They keep the top layer pretty, which is most of what we notice.
- Secure materials with care: A mix of clamps and double-sided tape works wonders; nothing ruins a project like a workpiece shimmy.
- Keep your CAM simple at first: Fewer tool changes, simpler toolpaths. Confidence is a resource too.
- Give acrylic time: Slow down the spindle a notch, keep the feed moving, and clear chips often.
- Practice engraving depth: Especially in metal and PCBs, trace depth makes or breaks clarity.
- Let surface mapping run: Even if your material looks flat, your eyes are romantics; the sensor is a realist.
- Embrace dust management: The enclosure helps, but vacuum after jobs to keep your bearings happy.
- Verify bit length in the collet: More secure grip equals less chatter and better accuracy.
Example Projects We Tried
We put the Cubiko to work on a batch of projects that represent the way we actually create. Some were practical, some decorative, and one was justified as “research” when we wanted to engrave unnecessary things for joy.
We built signs, inlays, nameplates, PCB prototypes, and a couple of metal tags that made us feel like we owned a spaceship. Each taught us a small lesson and gave us a better sense of what the Cubiko likes.
Project Table: Materials, Tools, and Outcomes
| Project | Material | Tool | Pass Depth | Notes | Outcome |
|---|---|---|---|---|---|
| Small hardwood sign with V-carved text | Maple | 60° V-bit | 1mm | Ran surface mapping first | Crisp lettering, minimal sanding |
| Acrylic panel with logo | Cast acrylic | 1/8” single-flute | 0.8mm | Lowered spindle speed to reduce melting | Glossy edges, clean pockets |
| Brass nameplate | Brass | 1/16” flat end mill + 30° V-bit | 0.5mm | Light oil, conservative feed | Sharp text, no burrs after light polish |
| Aluminum instrument faceplate | 6061 aluminum | 3mm flat end mill | 0.5mm | Multiple finishing passes | Precise cutouts, satin finish |
| PCB prototype | FR-1 board | 30° V-bit + 1mm end mill | 0.1–0.2mm for traces | Careful Z calibration and mapping | Continuous traces, functional board |
| Plywood inlay | Baltic birch + walnut | 1/8” downcut | 1mm | Tight fit; glue-up easy | Satisfying press-fit with clean edges |
| Pen plot test | Art paper | Pen mount | N/A | Good for verifying design scale | Smooth lines, zero tear-out |
We found ourselves relying on the surface measurement for anything that demanded even depth—PCBs and detailed engravings especially. In acrylic and wood, the combination of a clean tool and sensible feeds gave us results that looked more “finished shop” than “hobby corner.”
Maintenance and Longevity
We don’t want a machine that needs constant fussing, and the Cubiko doesn’t. But like any CNC, it appreciates a little routine care.
- Clean after each job: Vacuum chips, wipe the enclosure panels, and keep the bed free of debris.
- Check collets and bits: A dirty collet is a wobbly collet; swap dull bits before they punish you.
- Inspect rails and leadscrews: Light lubrication according to manufacturer guidance keeps motion smooth.
- Re-run calibration checks: If you see odd behavior—shallow cuts, off targets—do a quick test carve.
- Manage dust and static: Especially with plastics; a light anti-static wipe can reduce cling.
With steady care, the Cubiko feels like it’ll remain consistent. We often judge a tool by whether it seems to prefer being used, and the Cubiko does.
Comparison: Where the Cubiko Fits Among Desktop CNCs
We’ve used DIY kits that felt like engineering internships, and we’ve used premium rigs that cost more than a used car. The Cubiko sits in a lovely middle zone: it’s a real machine, not a toy, but it doesn’t demand we become a machinist to get a result.
Its strengths:
- Out-of-the-box readiness
- Safety-first enclosure with auto-stop lid
- Auto Z tool height and surface mapping
- Respectable metal capability within desktop limits
- Software flexibility and WiFi convenience
Its trade-offs:
- Conservative metal removal rates (by design)
- Best with smaller bits and finer work
- Encourages patience rather than speed
If you want a compact, confident path to accurate projects without an assembly odyssey, the Cubiko is a smart fit. If your goal is heavy aluminum stock removal or oversized workpieces, you’ll want something larger and more industrial.
Who Will Love It, and Who Might Want Something Else
We see this machine shining in studios, classrooms, design labs, and home shops where precision and tidiness matter. It’s especially good for:
- Beginners who don’t want to start with a wrench in one hand and a glossary in the other
- Designers and artists who care about detail and finish
- Electronics tinkerers who want to prototype PCBs without waiting
- Makers who share spaces and appreciate the enclosure’s safety and dust control
If your work demands aggressively fast metal cutting or wide-format panels, the Cubiko won’t be your best option. If you crave calm, controlled making on a desktop footprint, it’s hard to beat.
Real-World Comforts We Didn’t Expect
Sometimes it’s the little things that make us like a machine. The Cubiko earns points for not punishing our curiosity with catastrophic failures. The enclosure kept our space presentable enough that we could put it in a spare room without feeling like we were courting a dust storm.
We also liked the feeling of starting jobs quickly. Between auto Z, surface mapping, and reliable homing, we spent more time thinking about design and less time second-guessing setup.
Learning Curve: What the Tutorials Get Right
The included step-by-step tutorials do a couple of thoughtful things:
- They start with materials that are forgiving (wood, acrylic) before encouraging metal
- They show how to sequence tasks: design, tool selection, workholding, CAM, verification
- They encourage testing first and adjusting without shame
We appreciated the pace and the practical tone. It felt like a friend telling us the shortcuts without gatekeeping. If you’re new, those guides might keep you from the mistakes we’ve come to view as “character-building.”

Feeding, Speeds, and the Virtue of Moderation
The right settings are half the battle, sometimes more. We found ourselves gravitating toward the following rough guidelines (always adjust based on your bit, material, and comfort):
- Wood: Modest feed rates, 1–2mm passes for 1/8” bits; faster for 1/4” bits if the cut is simple
- Acrylic: Low-to-medium spindle speed, keep chips clear, 0.5–1mm passes for small bits
- Aluminum/Brass: Slow feeds, consistent chip load, 0.5mm passes, consider lubrication
- PCB: Very shallow passes (0.1–0.2mm), slow feed, patient finishing
We watched for the telltale signs of stress—chatter, scorching, melting—and adjusted. The Cubiko responds well to reasonableness.
Workholding: The Gentle Art of Not Letting Things Move
We’ve used elaborate clamps and we’ve used double-sided tape that could hold down a small pet. For the Cubiko, a combination works beautifully. Low-profile clamps keep the toolpath clear, while tape or a sacrificial spoilboard helps prevent tear-out when cutting through.
Our favorite trick was predrilling fixture holes in the spoilboard for repeat jobs. We became much faster at setting up recurring projects, and accuracy improved when we didn’t have to reposition everything from scratch.
Finishing Touches: Sanding, Polishing, and Looking Professional
In wood, we found that a quick sand with fine-grit paper brings out a surprising shine, especially on softwoods. In acrylic, we sometimes used a flame polish or a fine compound, but we were careful to avoid crazing.
Brass and aluminum benefitted from a light buff with a microfiber cloth and metal polish. We knew things had gone well when the inlays snapped in with a gentle press and didn’t require persuasion or philosophical reflection.
The Role of Surface Mapping in Everyday Jobs
We underestimated how often we’d use surface mapping. Even small variations in flatness can be enough to make text uneven or engravings vanish in one corner. The Cubiko’s ability to sense and compensate keeps detail consistent.
It’s not just a “problem fixer.” It’s a quality booster. Especially when we’re working on natural materials like wood that pretend to be flat in the store and confess later.
Noise: Manageable, Softer With the Enclosure
No CNC is whisper-quiet, but the enclosure takes the sharp edge off the noise. We ran jobs at times of day when we used to avoid machining, and no one in the next room staged an intervention.
Adding a vacuum for chip collection adds noise back, but even then, the sound signature is more of a controlled hum than an aggressive whine. We learned to appreciate it as the soundtrack of getting things done.
Safety We Actually Use
The cover-open auto-stop isn’t just a checkbox feature—it changes behavior. We were comfortable introducing friends to the machine because we knew opening the lid would bring the spindle to a halt. That eased the fear that keeps new users tentative.
We wore safety glasses anyway, because we like our eyes and our lives, but the added layer of protection made us relax into the process. Safety that lowers anxiety actually gets used.
Reliability: Day-to-Day Dependability
We ran a series of small production batches—coasters, labels, engraved badges—and the Cubiko didn’t hiccup. Repeatability was consistent; we adjusted feeds and speeds over time based on the wear of our favorite bits, and we didn’t have to retune the machine constantly.
It’s the feeling of a tool that’s waiting for instruction rather than attention. If we prepped the job well, it performed like a metronome.
Support and Community
Support matters more than we want to admit. We found guidance for the Cubiko through official tutorials and the broader community, including users working with Fusion 360, Easel, Candle, and Carveco. That multi-software ecosystem means you’re not locked into one learning path.
We saw enough chatter and examples to feel confident that if we got stuck, we could find a conversation about it. That’s worth as much as a few millimeters of Z-depth.
What We’d Do First If We Were Starting Today
If we were new to CNC and starting fresh with the Cubiko:
- Begin with a simple hardwood engraving using a V-bit
- Try a small acrylic cutout with a single-flute bit
- Run a brass nameplate job and keep passes at 0.5mm
- Use surface mapping on almost everything at first
- Test designs with the pen mount before committing to cuts
These early wins build muscle memory and confidence. The machine is capable; we just need to give it a fair start.
Favorite Details That Grew on Us
- The enclosure’s magnetic calm—no drifting chips, fewer floating surprises
- Auto Z on demand—less fiddling, fewer “oops” moments
- The way small metal tags emerged, sharp and purposeful
- The feeling of pressing an inlay into place and knowing it’ll stay
We stopped measuring our day in small setbacks and started measuring it in completed projects. That’s the real benefit.
Frequently Asked Questions We Had (and Answered)
We asked ourselves the questions we usually pretend we don’t have.
- Can it really cut metal? Yes—at 0.5mm per pass. Think careful engraving, plates, and light milling rather than heavy removal.
- Do we need the enclosure? For safety, dust, and noise, we’d say yes. It transforms where and when you can use the machine.
- How accurate is it, really? We saw consistent results in the ±0.1mm range for typical jobs. That’s enough for tidy inlays, clean text, and precise small parts.
- Will it work with our favorite software? It plays nicely with the Genmitsu App, Fusion 360, Easel, Candle, and Carveco. Having that flexibility means we can grow and pivot without replacing tools.
- Is it beginner-friendly? Very. The out-of-the-box readiness and tutorials make the early days gentler.
- Is it fast? It’s sensible. It prioritizes accuracy and finish over breakneck speed, especially in metals.
- Does the lid auto-stop really work? Yes. Open the lid mid-run and the machine stops. It’s reassuring every time.
The Bottom Line: What We’d Tell a Friend
We’d say this: the Genmitsu Cubiko CNC Router Machine with Enclosure is a thoughtful, capable desktop CNC that favors precision, safety, and sanity. It’s built to make us feel competent and to keep our space livable. Between auto tool height, surface mapping, and a sturdy frame, it encourages better habits without demanding perfection on day one.
We’d recommend it to anyone who wants to engrave wood and acrylic with confidence, prototype PCBs without ceremony, and create small metal pieces at a measured pace. We’d nudge heavy metal experimenters toward bigger gear. But for designers, makers, students, and home workshops, the Cubiko is the kind of tool that turns an idea into an object without needing a heroic act.
Final Thoughts We Keep Coming Back To
We used to think of CNC machines as moody roommates—amazing when things lined up, but demanding and difficult when they didn’t. The Cubiko isn’t moody. It’s steady. It’s sensibly cautious about metal, impressively neat with wood and acrylic, and surprisingly kind to those of us who like to try things and learn on the job.
That’s the real charm: it lets us get better by doing, not by worrying. We plugged it in, we made things, and our desk stayed calm. And in our world, that counts as progress worth repeating.
Should We Buy It?
If we want a smart desktop CNC that arrives ready to work, auto-adjusts tool height, measures surfaces for consistent results, cuts metal responsibly, contains dust, and stops the moment we open the lid, then yes—we should. It’s a machine that respects our time, our safety, and our desire to make something real without turning the room into a battlefield.
We can imagine keeping the Cubiko for years, relying on it for prototypes, gifts, badges, panels, and all the little parts that make our projects feel finished. In a landscape of clever machines, this one stands out for helping us feel clever too.
Disclosure: As an Amazon Associate, I earn from qualifying purchases.