Have we finally found a beginner-friendly CNC router that makes us feel competent, crafty, and only mildly dusty?


What We Were Hoping For (And What We Got)
We’ve spent enough Saturday afternoons wrestling with tools that promised to “make it easy” and then promptly made us question our life choices. With the Axiscreat CNC Router Machine 6060, we were cautiously optimistic. It’s sold as a beginner hobby engraving machine, but with a 710W trim router spindle, a 600 × 600 × 75 mm work area, and a mix of belt-driven X/Y axes and a linear rail on Z, it sounds a notch more serious than the average starter rig. We wanted reasonable setup, predictable accuracy, a clean workflow, and the freedom to carve more than coaster-sized dreams.
What we got was a machine that behaves like an overachieving lab partner—capable, structured, and slightly particular about how things should be done. In other words, our favorite kind of shop companion.
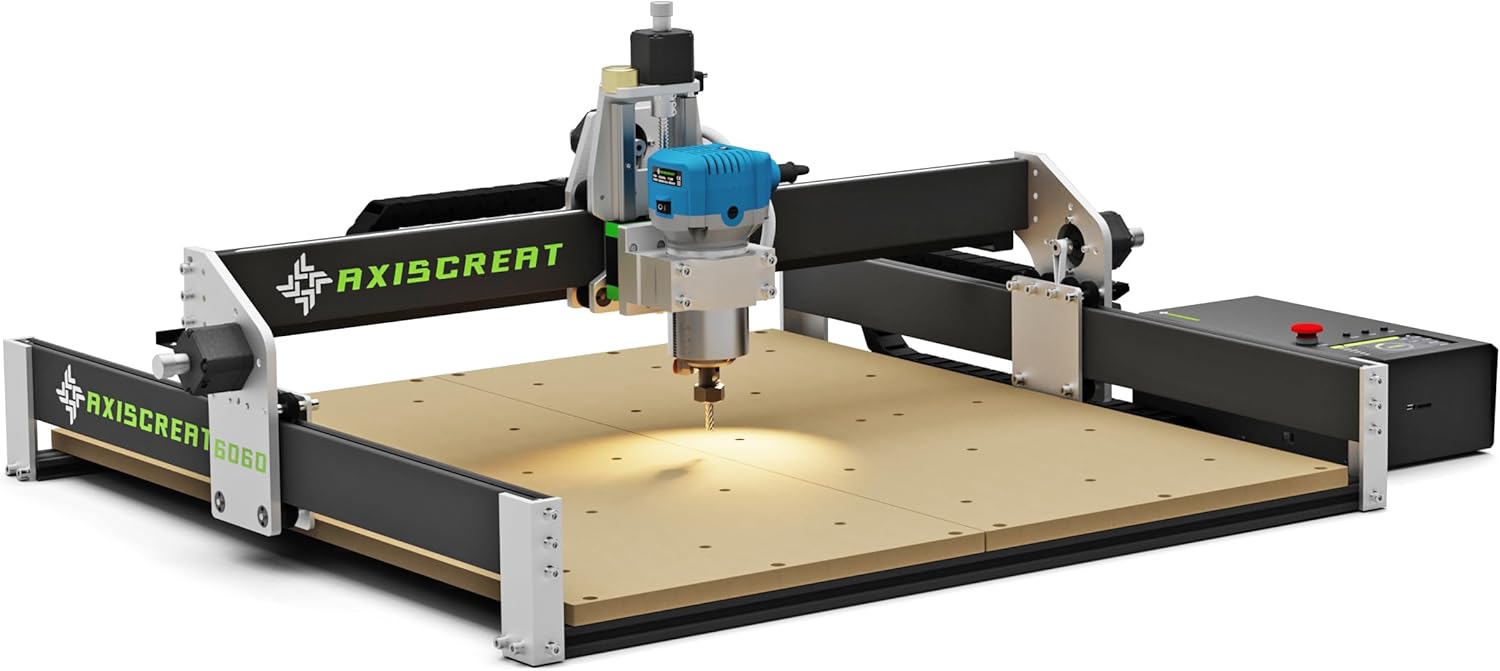
Axiscreat CNC Router Machine 6060, Beginner Hobby Engraving Machines, 710W Power Trimmer Router, Linear Rails and Belt Driven, 3-Axis Cnc Milling Machine for Wood, Acrylic, and MDF Carving
Key Specs at a Glance
Here’s a straightforward breakdown of the Axiscreat CNC Router Machine 6060 (also referred to as Axiscreat A6060 in the documentation). We like a clear picture before we start making chips.
| Feature | Details |
|---|---|
| Model | Axiscreat CNC Router Machine 6060 (A6060) |
| Work Area | 23.6 × 23.6 × 2.95 in (600 × 600 × 75 mm) |
| Drive System | Belt-driven X and Y axes; linear rail Z axis |
| Spindle | 710W trim router spindle; 6 preset speeds; 6000–30000 RPM |
| Control Options | 4.3-inch touchscreen offline controller; PC app; smartphone/tablet |
| Power Control | Power box with two 110V sockets controllable via the offline controller (router and vacuum) |
| Tool Setting | Automatic tool setter with optical touch signal; can set tools without powering the spindle |
| Design | Modular, partially pre-assembled; about 20-minute setup for experienced users |
| Maintenance | Inspect and tension belts regularly; replace 2GT 6 mm belts if frayed or curled |
| Power Supply | Factory set to 110V; switch to 220V if needed (control box only); spindle is 110V—use a step-down transformer for 220V mains |
| Ideal Materials | Wood, acrylic, MDF; suitable for beginner to intermediate projects |
| Safety Note | Keep feed rates conservative while learning to prevent missed steps or positional errors |
If we were to sum up the vibe: big work area, generous spindle, sensible design decisions, and plenty of control options. It’s more than we expect at this price tier.
Setup: From Box to Bench Without Tears
We’ve had furniture from that famous Scandinavian store that assembled faster than some CNCs, but the Axiscreat A6060’s modular format feels refreshingly considerate. Major subassemblies arrive pre-aligned, and we were up and jogging axes in roughly 20–30 minutes. That’s not a race-time challenge; that’s a realistic pace with a beverage nearby and a healthy respect for power cables.
The wiring is labeled, the cabling lengths make sense (no detective work behind the gantry), and the 4.3-inch offline controller connects cleanly to the control box. The router spindle mounts with an uncomplicated bracket, and the tool setter arrives ready to be placed on the spoilboard when needed. The included power box with two 110V sockets is a thoughtful touch: we could control both the trim router and our shop vacuum right from the offline controller. That’s not just convenient—it’s the domestic peace treaty our household needed.
Squaring and Tramming Made Painless
Getting a CNC to cut square circles—figuratively speaking—requires two checks: squaring the machine and tramming the router.
- Squaring the gantry: We loosened the Y-axis supports just enough to coax the frame square, then tightened it gradually. A reliable machinist square and a carpenter’s patience go a long way here.
- Tramming the spindle: A small dial indicator or a tramming gauge helps align the spindle vertically across the X and Y. Even a modest adjustment tightens up pocket bottoms and reduces ridges when surfacing.
While not mandatory to start cutting, a quick tram, a spoilboard surfacing pass, and a few test cuts make the long-term ride smooth.
If We’re on 220V Mains: How We Stayed Out of Trouble
This is important, and it’s the sort of thing we like to underline, highlight, and maybe tape to the wall. The control box is factory set to 110V. If we’re running on 220V mains, we must:
- Switch the control box to 220V first (the switch is documented on the control box diagram).
- Use a step-down transformer to 110V for the trim router spindle, because the included spindle is 110V only.
We kept both the control box and spindle safe by honoring the voltage rules. Nothing ruins a workshop weekend like a sizzling noise that isn’t bacon.
Design Choices That Actually Help Us Succeed
We’ve used CNCs with lead screws and ball screws, and we’ve used belt-driven systems that were charmingly optimistic but ultimately wobbly. The Axiscreat A6060 splits the difference wisely: belt-driven X and Y axes for speed and simplicity, with a linear rail Z for stiffness where it counts. That linear rail Z is the star of the structure show—Z axis wobble ruins cuts more quickly than any other mischievous element.
The belts, when properly tensioned, keep travel smooth and keep backlash tame. Belt-driven machines also tend to be lighter and easier to maintain. The manufacturer’s maintenance notes (inspect and tension belts; replace 2GT 6 mm belts if frayed) are spot on. In the real world, belts are a wear item—like car tires. Check them, show them love, and they love you back.
Automatic Tool Setter: An Unsung Hero
We’ve grown fond of the automatic tool setter with its optical touch signal. Touch off the bit without spinning the spindle, and it feels like magic the first time you watch it work. No more shimmying a piece of paper under a spinning tool while pretending we’re calm. Set the tool length, store it, and enjoy repeatable Z heights. This is particularly helpful for multi-tool jobs, or the moment we decide to get ambitious and add a V-bit for engraving after a roughing pass.
Controls: A Comfortable Mix of Offline and Connected
We appreciate that Axiscreat didn’t tether us to one workflow. Some days we want the PC tethered, other days we’d rather run from the offline controller or a mobile device and keep the laptop out of harm’s way.
- The 4.3-inch touchscreen offline controller is intuitive enough for daily use: jogging, setting zeros, running files, and toggling those two power sockets for the router and vacuum.
- The control box consolidates power and keeps everything tidy.
- We can also control via PC or mobile/tablet app, which gives us flexibility in file management and live monitoring.
The offline controller became our go-to for production-type jobs. For dialing in feeds and speeds or watching a new design like a hawk, we felt more comfortable running from a PC.
Offline Controller Tips That Saved Us Time
- File naming: We kept names short and descriptive; it’s easier to read on the controller and reduces any finicky file-system behaviors.
- Zeroing: We established a shop standard. Front-left corner, top of stock. Every. Single. Time. Consistency prevents confusion.
- Tool setting sequence: We made it a routine—Mount bit, use tool setter, set zeros, then start the job. No skipped steps, no surprises.
Running from a PC or Mobile Device
When we wanted better previewing and easier parameter changes, we ran from a PC application. We like being able to simulate toolpaths and tweak G-code settings without squinting. A smartphone or tablet is handy for basic job control, especially when we don’t want a laptop near sawdust and static.
Regardless of the control method, we stuck to the same safety habits:
- Vacuum on before the spindle spins.
- Eye and ear protection.
- Hands clear, cords tidy, pets bribed to stay elsewhere.
Spindle and Cutting Power: More Muscle Than We Expected
The 710W trim router spindle is quietly confident. With 6 preset speeds ranging from 6000 to 30000 RPM, it covered everything we asked of it. We ran a series of cuts in pine, birch plywood, walnut, MDF, and cast acrylic. The real torque is around mid to high RPM, as with most trim routers, but we kept our passes reasonable and our bits sharp. The result: clean edges, predictable pocket floors, and a pleasing whirr that reminded us we were making something.
The deeper cuts were appropriate as long as we matched feed, speed, and bit selection. The spindle offers a satisfying blend of power and accessibility—you won’t be surfacing oak slabs at warp speed, but for the intended use, we were well served.
Cutting Wood: From “We Should Try This” to “We Did That”
- Pine and softwoods: 1/4-inch upcut bit, 18000–22000 RPM, 1000–1500 mm/min feed, 2–3 mm depth per pass. We got neat chips, minimal tear-out, and reliable pockets.
- Birch plywood: 1/4-inch compression bit for through-cuts, 18000–22000 RPM, 800–1200 mm/min, 1.5–2 mm per pass to avoid veneer blowout. For pocketing, we liked a 1/8-inch downcut bit for a cleaner top surface.
- Walnut/maple: 1/4-inch upcut or two flute, 16000–20000 RPM, 800–1200 mm/min, 1.5–2 mm per pass. We tuned to prevent burning; sharper bits help.
We kept tabs on the chips. Dust means we’re rubbing more than cutting. Chips mean we’re doing it right.
Milling MDF: Embrace the Dust, Then Control It
MDF cuts like butter and produces dust like a confetti cannon. We ran 1/4-inch upcut bits around 18000–22000 RPM, 1000–1500 mm/min feed, 2–3 mm depth of cut for pockets, and 1.5–2 mm for through-cuts. A dust shoe and a decent shop vacuum are not optional here—they are essential. We also surfaced our spoilboard at 12000–16000 RPM, 800–1000 mm/min, using a 1-inch flycutter. The results were clean, and our machine looked like it preferred having a flat, happy workspace.
Acrylic: The Trickiest Material We Still Like Working With
Acrylic is where a lot of newcomers swear off plastics because they melt and smear. We kept everything cooler:
- Single-flute O-bit, 14000–18000 RPM, 600–900 mm/min, 0.5–1.0 mm per pass.
- Steady feed to prevent rubbing.
- Masking film left on the sheet during cutting to protect the surface.
- Climb cutting for cleaner edges when finishing.
With the 710W spindle’s adjustable speeds, we found the right “staccato” of cutting rather than the “screech” of melting. The edges came out smooth enough to polish, and our scrap bin did not overflow with acrylic confetti.
Depth of Cut and Step-Over: The Goldilocks Zone
- Roughing passes: 40–50% step-over, conservative depth.
- Finishing passes: 8–12% step-over for clean walls and floors.
- Conventional vs. climb: For plastics and hardwoods, we usually finished with climb for better edge quality.
We also remembered the manufacturer’s friendly reminder: keep feed rates modest while we’re still getting the hang of things. That advice prevented more headaches than coffee ever solved.
Accuracy, Repeatability, and the “We Can Trust This” Factor
We measured our calibration squares and circle tests and saw repeatability consistent enough for tight-fitting finger joints, inlays, and sign lettering. Belts demand discipline—good tension and occasional inspection—but the linear rail Z and the sturdy frame compensate and keep the cut quality consistent. With careful setup, we were satisfied near the ±0.1–0.2 mm range for most practical hobby work. That’s plenty for furniture joinery, jigs, templates, and signage.
Belt Tension: The Ritual That Pays Us Back
The routine:
- Inspect all three belts regularly. If frayed or curled, replace with 2GT 6 mm belts.
- If a belt’s loose: loosen the mounting screws, re-tension, re-secure.
- Listen during long jobs. Squeaks or skipped teeth are not a soundtrack we want.
The manufacturer’s maintenance tip mirrors our experience. Tension is not one-and-done; it’s a seasonal check like sharpening chisels or apologizing to houseplants.
Workholding: Where the Spoilboard Becomes Your Best Friend
We went with a combination of T-track clamps and the tape-and-glue method (blue painter’s tape on both surfaces with CA glue in between). For delicate acrylic jobs or thin veneers, tape-and-glue is gentle and secure. For deep cuts and big boards, clamps are reliable—as long as we keep them out of the toolpath. We ran a perimeter ditch around the spoilboard to mark a “no clamp” zone and saved ourselves a dozen heart palpitations.

Projects That Actually Use the 600 × 600 mm Space
The work area is the part that made us feel… free. We didn’t have to cut our designs down to fit the machine; we could plan at 24 inches square and just go for it. Here’s what that opened up:
- Signage with large text and flourishes: bold house numbers, wedding signs, shop logos.
- Cutting boards with inlays: walnut and maple patterns, juice grooves, monograms.
- Wall art panels: topographic maps, geometric lattices, name plaques.
- Drawer fronts and small cabinet panels with V-carve details.
- Game boards: chessboards, backgammon, cribbage templates.
- Lamp panels with acrylic inlays and wooden frames.
- Jigs for routers, drill presses, and woodworking templates.
- Ukulele body templates and guitar headstock patterns.
We split some long pieces diagonally across the bed (artful clamping required), and profile cuts remained clean with the right bit and feed.
Time Estimates We Found Useful
- Surfacing the spoilboard: 20–40 minutes depending on settings and bit size.
- Sign with 3D roughing and finishing: 90–180 minutes, material dependent.
- Cutting board with juice groove and engraving: 45–90 minutes.
- Acrylic panel with pockets and profile: 40–120 minutes depending on detail.
We learned that when in doubt, we shaved a millimeter off the depth of cut and let the machine take its time. The finished piece always looks better than the rushed one.
Noise, Vibration, and Dust: Our Sensible Compromises
It’s a trim router, which means it’s not quiet. Ear protection is kind to our future selves. With a dust shoe and our vacuum, we tamed the particle cloud to a livable level. We placed the machine on a sturdy bench and used rubber isolation pads underneath. Vibration felt well controlled; the linear rail Z keeps heavy cuts from wobbling. For apartments or shared spaces, we’d pick daytime hours and possibly a quieter vacuum. The router will still announce itself, but not in a way that endangers neighborly relations.
Software and Workflow: From Design to G-code to Satisfying Chips
Everyone’s software stack looks different, but ours typically involves:
- CAD/CAM creation in programs like Carbide Create, VCarve, Fusion 360, or Easel. We pick based on the project—V-carving versus 3D contouring versus simple pocketing. We export G-code using a standard GRBL-compatible post when needed.
- File transfer to the offline controller or direct streaming from a PC application.
- Test run above the workpiece to verify our zeros and direction before committing.
We always simulate (if using a PC) and keep a spare piece of MDF handy for test runs. MDF never complains about being our practice partner.
Safety and Power: The “Let’s Keep Everything Working” Section
We cannot overstate the power supply notes:
- Control box: switch to 220V if on 220V mains.
- Spindle: always 110V; use a step-down transformer on 220V mains.
- Two controllable sockets: run the trim router and vacuum. Keep the area clean and cords neatly routed.
We also:
- Used a grounded outlet and proper extension cords rated for the load.
- Added an emergency stop button within easy reach (if not built-in, we used a kill-switch on the power strip).
- Kept the work area free of loose fabric, gloves near spinning tools, and anything that could tangle with belts.
We like our fingers exactly where they are.
Pros and Cons We Actually Care About
What We Loved
- Large 600 × 600 × 75 mm work area—creative freedom for bigger projects.
- 710W spindle with adjustable 6000–30000 RPM and preset speeds—flexible and capable.
- Linear rail Z axis—stiffer, more reliable cuts.
- Automatic tool setter—fast, repeatable, non-scary tool touch-off.
- 4.3-inch offline controller—run jobs without babysitting a laptop.
- Two controllable 110V sockets—spindle and vacuum control made clean and simple.
- Modular, pre-assembled design—setup measured in minutes, not days.
Where We Adjusted Expectations
- Belt-driven X/Y requires ongoing belt checks—no big deal, but not zero maintenance.
- Trim router noise is real—use ear protection and consider neighbors.
- Spindle rated for 110V only—220V users must use a step-down transformer.
- As a beginner machine, pushing aggressive feed rates can lead to missed steps—patience pays off.
Who Should Buy the Axiscreat A6060
- Beginners who want a serious starter machine with a large usable area.
- Hobbyists moving up from tiny engravers to something that handles furniture parts, cutting boards, and wall art.
- Makers who value an offline controller and simple power management.
- Anyone who appreciates a light-tune machine that can be reliable with regular belt maintenance and a correctly trammed spindle.
If we need aerospace tolerances or heavy aluminum machining, this isn’t the target tool. But for wood, acrylic, and MDF—which is where most of us live—this is a very compelling option.
Troubleshooting: The Greatest Hits of “Why Did It Do That?”
Missed Steps or Positional Drift
- Likely causes: feed too high, DOC too deep, belts too loose.
- Fix: lower feed, shallow passes, tension belts per manufacturer’s guidance. Check pulleys for set-screw tightness.
Chatter in Hardwood
- Likely causes: worn bit, excessive step-over, spindle speed too high/low.
- Fix: install a sharp bit, reduce step-over to 8–12% for finishing, tune RPM.
Acrylic Melting and Gooey Edges
- Likely causes: rubbing instead of cutting, RPM too high relative to feed, wrong bit.
- Fix: single-flute O-bit, moderate RPM, maintain confident feed. Leave the protective film on during cutting.
Rough Pocket Floors
- Likely causes: spindle not trammed, dull bit, excessive DOC.
- Fix: tram the spindle, use a sharp bit, reduce depth per pass, use a finishing pass.
Tool Setter Not Triggering
- Likely causes: poor placement or debris, cable not seated.
- Fix: clean contact surfaces, ensure stable placement on the spoilboard, rerun the tool set routine.

Upgrades and Accessories We’d Actually Use
- Dust shoe: mandatory for MDF, and frankly for everything else if we enjoy breathing.
- Assorted end mills: 1/4-inch upcut, 1/4-inch compression, 1/8-inch downcut, single-flute O for plastics, and a 60/90-degree V-bit.
- Clamping kit and T-tracks: stable workholding is 80% of the battle.
- Spoilboard surfacing bit: a 1-inch flycutter with replaceable inserts works well.
- Step-down transformer (for 220V mains): keep that 110V spindle happy.
- LED strip lighting over the work area: we’ve all looked for tiny chips in the shadows; let there be light.
- Bit setters and edge finders: even though the machine includes an automatic tool setter, a corner finding routine or touch probe workflow can speed multi-step projects.
Care and Feeding: The Boring Stuff That Prevents Boring Problems
- Belts: inspect regularly; tension if needed; replace if frayed (2GT 6 mm).
- Linear rails and lead screws (Z): wipe dust and lightly lubricate per manufacturer’s guidance.
- Fasteners: every few weeks, check frame bolts and mounts. Vibrations can whisper things loose.
- Spoilboard: surface it when edges look ragged or cuts start showing ridges. We also replace it periodically and maintain a grid pattern for consistent clamping.
- Router collet: keep it clean. Debris in the collet leads to runout and snapped bits, and neither is fun.
Everyday Workflow We Trust
- Design in CAD/CAM.
- Choose bit and feeds/speeds modestly.
- Mount stock; ensure it’s flat and clamped clear of toolpaths.
- Run the automatic tool setter.
- Zero X/Y/Z where we always zero.
- Simulate if on PC; sanity-check the first pass above the work.
- Start vacuum, then router, then the job.
- Watch the first few toolpaths like a hawk. We have no hawks, so we volunteered.
- Clean up, log our settings, and lay out the next job.
Logging settings in a notebook or spreadsheet turned out to be the secret sauce for repeatable success. Future us is always grateful to past us.
Real-World Results We Can Stand Behind
We cut a layered walnut-and-maple cutting board with a recessed logo; the 1/8-inch downcut handled the lettering crisp at 0.8 mm depth. We milled a cast acrylic lamp panel using a single-flute O-bit at 15000 RPM and a gentle feed; the edges were ready for polishing with only light sanding. We ran a large birch plywood sign with a compression bit and ended the day feeling like people who know things.
The Axiscreat A6060 doesn’t pretend to be industrial, and we don’t need it to be. What it is, is consistent. With the right expectations and a bit of routine care, it puts out work we’re proud to show off.
A Quick Comparison Within Its Class
Among belt-driven, beginner-friendly CNC routers, the Axiscreat CNC Router Machine 6060 stands out for:
- Its larger 600 × 600 mm work area—more room than the common 300–400 mm rigs.
- The inclusion of a 710W spindle with 6 preset speeds—some kits expect us to source a router separately.
- The linear rail on the Z axis—this keeps a common weak point stronger.
- An automatic tool setter—rare at this price point, and genuinely useful.
We’re aware that screw-driven systems can offer better long-term rigidity, but they often come with higher cost, smaller work areas, or more complex assembly. The A6060 strikes a practical balance for hobby woodworking and plastics.
Tips for Getting the Cleanest Results
- Keep bits sharp and appropriate to the material. A dull bit is a liar and a thief.
- For detailed engraving, use a 60-degree V-bit, not a flat end mill. The results look like we meant them.
- Use tabs on profile cuts and widen them slightly for thin materials to avoid last-second chatter.
- Sand lightly after machining—especially on MDF—and consider sealing MDF with shellac or a primer before paint.
- For multi-tool jobs, confirm tool lengths after every change with the tool setter. It takes seconds, saves hours.
- Record feeds/speeds that worked. We’ve said this already, and we’ll keep saying it.
The Power Box: Small Feature, Big Quality-of-Life Boost
We didn’t realize how much we’d appreciate the power box’s two 110V sockets until we used them. Being able to control our vacuum and the spindle in sync with job actions meant less fumbling and fewer opportunities to forget something important. When paired with the offline controller, this feels close to a single-console shop management system. It’s neat, it’s safer, and our floor is happier with fewer cords strewn across it.
Edge Cases and Honest Limits
- Aluminum: We know someone will ask. It’s possible with very conservative settings, sharp single-flute end mills, lubricant, and patience. But this is not what the machine is designed for. Wood, MDF, and acrylic are its sweet spot.
- Production runs: For dozens of parts a day, we’d schedule in belt checks and more frequent dust clearing. The machine can handle long jobs, but consistent maintenance will keep it precise.
- Thick stock: The Z travel is 75 mm; plan our workholding and cutter length to avoid bottoming out. Raising the work on a secondary spoilboard or using longer tools can help, but longer tools increase leverage on Z. Moderation, again.
What We’d Change If We Could
We’d love a quieter spindle with electronic control integrated, but that’s a different class of machine. We’d appreciate a bundled dust shoe and a clamp kit, since most of us need them on day one. That said, we understand the modularity keeps cost down and lets us choose our own accessories.
The Short Version of a Long Story
- The Axiscreat CNC Router Machine 6060 gives us a large work area, a powerful 710W spindle with 6 preset speeds, a linear rail Z for stability, and an easy path from setup to first cut.
- The 4.3-inch offline controller and power box with two controllable 110V sockets simplify daily use more than we expected.
- With belts on X/Y, we accept a little maintenance in exchange for speed and approachable cost.
- For wood, acrylic, and MDF, it produces clean, consistent results—especially when we stick to conservative feeds while learning.
- If we’re on 220V mains, we set the control box switch to 220V and use a step-down transformer for the 110V spindle. We do not wing it. We like our electronics unsinged.
Final Thoughts: Would We Keep It on Our Bench?
We would. The Axiscreat CNC Router Machine 6060 fits that sweet spot where beginners can learn fast and hobbyists can grow into larger, more ambitious work. The automatic tool setter removes a common headache, the large work area unlocks genuinely useful projects, and the spindle has enough muscle to keep us interested long after the first weekend.
It’s sturdy without being intimidating, capable without being fussy, and designed with a human being’s workflow in mind. We’ll happily keep using it for wood signs, cutting boards with inlays, acrylic lamp panels, and the strange gifts we make for relatives who politely pretend they’re not confused. For the money, and for its intended materials, it’s a machine that makes us feel like we know what we’re doing—and sometimes that’s exactly what we need.
Disclosure: As an Amazon Associate, I earn from qualifying purchases.