Would you mind if we keep a wry, confessional tone while not copying any one author’s exact style?


What is the AlgoLaser 3W Smart Laser Engraver Machine?
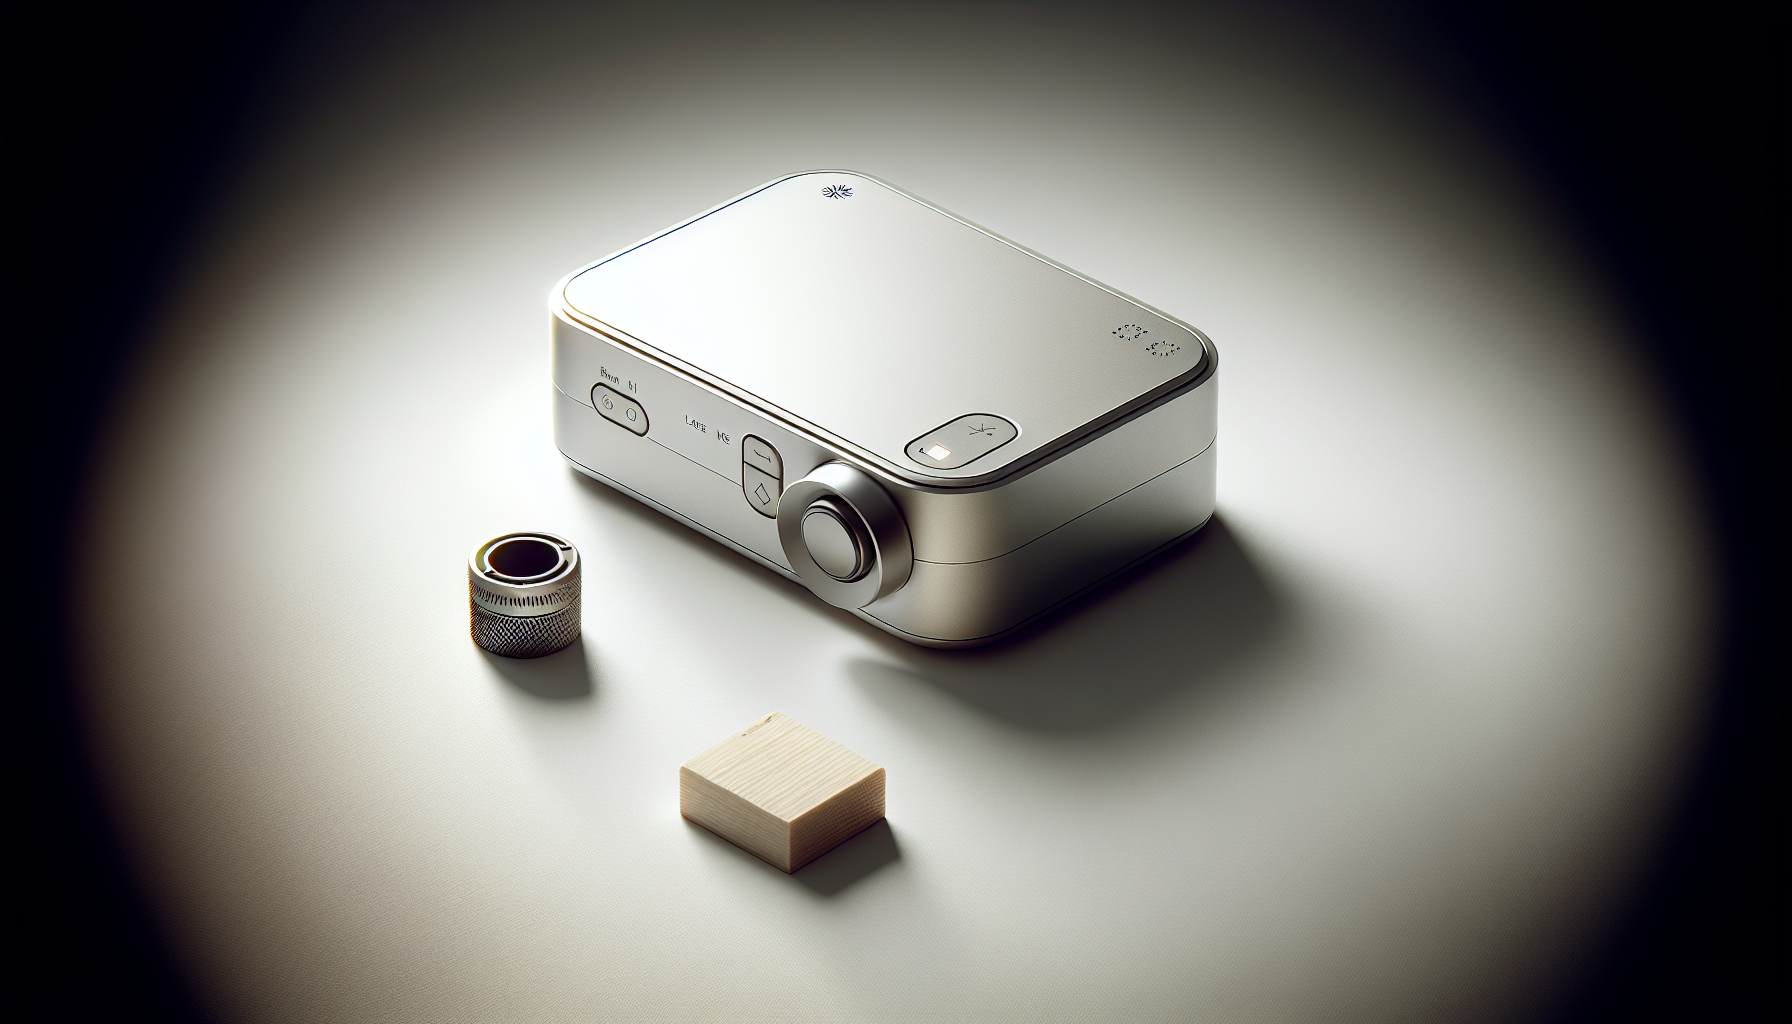
We call it a small, clever box that turns our “I wish we could personalize that” moments into actual keepsakes. The AlgoLaser 3W Smart Laser Engraver is a Class 1 Portable Laser cutter and engraver with a built-in AlgoOS 2.0 operating system and a 3.5-inch touchscreen. It doesn’t need a PC to run, which we appreciate because our laptop already resents us for making it host video calls, play music, and manage 72 tabs.
Under the hood, it’s got a 48W power system driving a 3W (3000 mW) diode laser. That combo favors precision engraving, clean marking, and delicate cutting on thin materials. Think of it as a nimble pen rather than a sledgehammer—wonderful for detail, not intended to hack through lumber.
Who is it for?
We see this as a sweet spot for first-time laser users, casual makers, craft sellers, and classrooms. It’s beginner-friendly, portable, and doesn’t require screwdriver sculpture to assemble. If we’re managing a small creative business, teaching a STEM club, or crafting gifts at the kitchen table, this kind of machine makes us look surprisingly competent.
It also suits anyone who wants quick projects without wrestling with drivers, cables, or software licenses. And when we do want advanced control, it plays nicely with LightBurn and LaserGRBL.

AlgoLaser 3W Smart Laser Engraver Machine, Class 1 Portable Laser Cutter with Built-in 2.0 AlgoOS System, No PC Needed, Laser Engraving for Wood, Acrylic, Leather.
Design, Build, and Everyday Practicality
On our desk, the AlgoLaser looks tidy and self-contained, with an integrated safety guard and a removable honeycomb platform. The honeycomb is the grid our materials rest on, and it helps with airflow and cleaner edges. We can pop it out to fit the machine over larger pieces, like a chair back or a cabinet door. It’s the difference between being able to engrave a coaster and being able to engrave the thing we accidentally stained and now want to call “custom.”
The all-in-one build takes the edge off the usual maker anxiety. No bags of bolts, no “where does this bracket go,” and no silent household judgment as we build “another contraption” on the dining room table. We carry it, place it, and we’re most of the way there.
Class 1 Safety Guard and Ergonomics
We appreciate that it’s Class 1, which means the safety features are designed so the laser is safe under normal use. The guard helps contain stray light, and if we open it mid-job, the machine pauses. Close it, and it picks up where it left off—like a polite barista remembering our order after we ran to get a wallet. The guard doesn’t make the machine consequence-free—we still wear our safety goggles—but it builds confidence, especially around curious kids or skittish pets.
The touchscreen is placed so we don’t contort our wrists. The interface is finger-friendly, with big icons that make us feel capable even when we haven’t had coffee.
Setup: From Box to First Burn
We love that there’s no installation circus. We take it out, plug it in, and it boots to AlgoOS 2.0. The 3.5-inch touchscreen leads us through basic steps, including connecting to WiFi. The machine supports OTA (over-the-air) updates and will automatically detect firmware versions, which means we’re not chasing files on forums or worrying we’re stuck in 2023 forever.
It supports multiple languages, so if we gift it to someone who doesn’t share our interface language, they won’t be stuck deciphering our cryptic “try the gear icon” text messages.
Our First Project
We started with one of the pre-installed engraving templates because confidence is a fragile thing. Within minutes, we selected a design, set up a small wood coaster, and watched the laser etch our masterpiece. We say “masterpiece” generously. The result was crisp and surprisingly professional, by which we mean we did not hide it in a drawer and call it “a learning experience.”
From there, we tried a custom design pulled from a USB-C connection and later sent a file over WiFi. It felt wonderfully normal—like using a printer that doesn’t shame us with cryptic errors.
Software and Smart Features
AlgoOS 2.0 is the machine’s onboard operating system. It’s not just a menu—it’s a workflow. We can scroll through projects, adjust settings, position our design, and start jobs right from the screen. If we want more power and flexibility, we connect LightBurn or LaserGRBL and go deeper into settings.
We like that there’s a library of example projects that’s online-updatable. It’s like having a recipe book built into the oven. We can also create our own projects, save them, and run them again later. This is great for products we make in batches: keychains, tags, ornaments, or anything we’re tired of re-creating from scratch every time.
OTA Updates and Version Detection
A machine that keeps itself current is a small miracle. With OTA updates, it notifies us when improvements are available, pulls them down, and installs. No spreadsheets of versions, no thumb drives labeled “Do Not Lose,” and no weird compatibility issues because we’re on old firmware while the rest of the world has moved on. We just tap “Update,” watch it do its thing, and carry on.
Mobile Remote and Offline Mode
We can control it over WiFi, which is handy when we’re across the room or hiding from the test cut that got a little smoky. When we’re offline, SD card support keeps us productive. We can load files, walk to the machine, and run them without worrying whether our network is acting fussy. Type-C connectivity rounds out the options—we plug in and go, the way we wish more devices behaved.
Connectivity, Compatibility, and File Handling
The AlgoLaser supports LightBurn and LaserGRBL, two staples in the laser community. LightBurn is especially popular for its powerful layout and control tools, while LaserGRBL is a solid free option. We like having both, because sometimes our projects want the full design suite, and other times we just want an efficient pipeline to “go burn this.”
On files, we recommend standard vector formats (SVG, DXF) for clean lines and raster formats (PNG, JPG) for photos. With a 3W diode, photos benefit from dithering and careful power tuning—we’ve had successes on wood and coated metal, and occasional “huh, that’s blotchy” moments when we forgot to test.
Table: Key Specs and Features at a Glance
| Feature | What it means | Our take |
|---|---|---|
| Laser output | 3W (3000 mW) diode | Ideal for engraving and thin cutting; not for thick wood. |
| Power system | 48W total power | Stable performance; efficient and quiet. |
| Built-in OS | AlgoOS 2.0 with 3.5″ touchscreen | No PC needed; beginner-friendly and fast to learn. |
| Connectivity | Type-C, WiFi, SD card | Flexible; works online or offline easily. |
| Software compatibility | LightBurn, LaserGRBL | Great for both casual and advanced workflows. |
| Safety | Class 1 guard, tilt alerts, auto-pause/resume | Reassuring, especially in home or classroom settings. |
| Accessories | Flat, roller, jaws compatible | Engrave flat items, cylinders, and held pieces. |
| Exhaust | Built-in smoke removal; optional purifier | Keeps air clearer; purifier recommended for indoor use. |
| Platform | Removable honeycomb | Better airflow, cleaner edges, and fits larger workpieces. |
| Example library | Pre-installed, online-updatable | Quick wins for beginners; reusable templates for pros. |
Performance: What We Actually Got
In use, the AlgoLaser feels precise and deliberate. It’s more “etch a monogram perfectly” than “cut a cutting board in half.” With a 3W diode laser, we focus on detail: clean lines on wood, crisp marks on leather, and legible text that doesn’t look like it’s been to battle.
We’ve found speeds can be surprisingly brisk for engraving fine details on wood and leather. Thicker or denser materials require slower passes or multiple passes, which is normal for this class. Edge charring is manageable with the right power settings and, if needed, a bit of masking tape.
Engraving on Wood, Acrylic, Leather, and More
Wood is where this machine shines. We’ve worked with birch, basswood, and bamboo, and they behave nicely. Grain affects how uniform the burn looks—soft woods can burn slightly darker where the grain is lighter. Leather also engraves beautifully, although we’re careful with power so we emboss rather than crater.
Acrylic depends on color and type. Diode lasers are absorbed by darker acrylics more readily than clear. With black or dark-colored acrylic, we’ve gotten clean engravings and thin cuts. Clear and blue acrylics can be stubborn with visible light; when in doubt, test a corner or use a scrap piece to dial in settings.
Coated metal and anodized aluminum mark well. Bare stainless steel may require a marking spray for permanent results. Paper and cardstock are easy, but we set the power low and keep the exhaust on, because we’ve all learned the hard way that paper really wants to be dramatic.
What It Cuts, Realistically
A 3W diode will cut thin materials nicely. We’ve cut:
- 1–2 mm basswood in a few passes with clean edges
- Thin leather for patches and bands
- Black acrylic in thin sheets
- Cardstock and kraft paper
- Felt and some fabrics (test first; fiber melt varies)
If our goal is cutting 5–6 mm plywood in a single pass, this isn’t the right category. But for signs, coasters, tags, ornaments, stamps, and inlays, it’s a capable workhorse that rewards careful tuning.
Accessories: Flat, Roller, and Jaws
“Flat” is the standard bed, excellent for boards, covers, tags, and any classic rectangle we throw at it. Add a roller, and suddenly we’re personalizing tumblers, pens, candles, and round jars. The jaws hold small or irregular items steady so designs land precisely where we intend.
We love how these accessories change the personality of the machine. With a roller attachment, we turn weekend events into mini businesses—engrave names on drinkware and watch the line form. With jaws, we capture small items that otherwise squirm under the laser.
Removable Honeycomb and Exhaust
The honeycomb bed supports materials while allowing smoke to flow below and out, reducing scorch marks. It also helps with small offcuts that would otherwise fuse to a flat bed. Remove it, and we can position the engraver over a larger surface like a tabletop—carefully checking focus height for the best results.
The built-in exhaust pulls smoke out during the job. Indoors, we’d pair it with the optional smoke purifier or a dedicated vent setup because engraving wood and leather has a scent that lingers. We like the purifier for shared spaces; it keeps the room far more pleasant and prevents the “what did you burn?” interrogation.

Safety Features and Peace of Mind
Safety is woven into the way we work. The AlgoLaser automatically pauses when we open the guard, and it gives a tilt alert if something shifts. If the machine senses a small malfunction, it attempts to handle it or at least warn us, which frees us from standing there like anxious parents with a hand hovering over the stop button.
We keep our safety goggles nearby—laser light isn’t a thing we bargain with—and we give the machine a clear radius from flammables. Our rule: no leaving it unattended. The little red beam is great company until a corner of cardstock curls and thinks it’s a candle.
The Class 1 Caveat
Class 1 reduces risk in normal operation, yet it doesn’t eliminate the need for good habits. We:
- Wear eye protection, especially when the guard is open for setup
- Ventilate well, using the exhaust and purifier or an outdoor vent line
- Keep a small fire extinguisher within reach
- Secure materials so they don’t shift mid-pass
- Run tests on scraps because popcorn isn’t the only thing that burns
Everyday Workflow: From Idea to Object
This is where the AlgoLaser quietly excels. Our typical flow:
- Choose a pre-installed design or import a file via WiFi, SD, or Type-C.
- Place material on the honeycomb bed and set focus height.
- Use the touchscreen to position the design and set power, speed, and passes.
- Run a quick test square in a corner, then start the job.
- Watch the progress, adjust if needed, and bask in feeling capable.
The touchscreen’s responsiveness helps a lot. We’re not hunting for commands or wondering whether the machine got our message. It’s self-contained, which we appreciate when we don’t want a laptop perched nearby collecting sawdust.
Repeat Jobs and Small-Batch Production
If we sell custom items, being able to save projects onboard is huge. We create a “Monogram Coaster” template, then simply change initials and hit go. For events, we set up name tags or pet tags and run them one after another. The exhaust and honeycomb keep the air and edges cleaner, which saves us cleanup time later.
Results: Quality, Consistency, and Learning Curve
We found engraving quality to be crisp, with thin lines and legible fonts down to surprisingly small sizes, especially on birch and bamboo. Photos require a bit more finesse—dithering patterns and power adjustments—but the results can be striking. On leather, we use moderate power to avoid deep craters; the goal is a contrast burn that looks purposeful, not like a dragon napped on it.
Consistency improves as we build a small library of material settings. The machine is beginner-friendly, and with a few test grids, we feel like we’re wearing a secret superhero cape.
Lessons and Best Practices We Wish We Knew on Day One
- Focus matters more than we think. Take the extra minute.
- Blue painter’s tape can reduce soot on wood edges; peel it after the cut.
- Start with lower power and increase slowly; the material won’t complain if we’re gentle.
- Clean the lens periodically; smoke residue is sneaky.
- Make a test grid for each commonly used material and keep it nearby.
Compared to Other Laser Options
We’ve used hulking desktop rigs, portable wand-style lasers, and DIY frames that needed a week of patience. The AlgoLaser lands in a very practical pocket:
- Versus larger diode engravers (10W–20W): This 3W unit trades raw cutting power for comfort and simplicity. It’s quieter, more compact, and truly PC-free. If we mainly engrave and do thin cuts, we won’t miss the extra wattage.
- Versus portable handheld/galvo units: Those can be fast and teeny-tiny precise but often cost more and limit workable areas. AlgoLaser gives us a friendly work surface with a safety enclosure and better general-purpose versatility at a more approachable price.
- Versus CO2 lasers: CO2 offers more cutting power and cleaner acrylic edges but at the cost of size, complexity, maintenance, and price. If we’re not producing furniture or thick acrylic signage, a 3W diode covers an awful lot of creative ground.
For us, the AlgoLaser feels like the “daily driver” of home lasers. It’s not the race car or the cargo truck, but we’re using it constantly because it’s already warmed up and ready to go.
Use Cases We Loved
- Personalized gifts: coasters, picture frames, cutting boards (engraving, not cutting), leather bands, keychains
- Small business branding: logos on packaging, tags, signage accents
- Education: STEM projects, art classes, materials science demos
- Events: on-the-spot name engraving on tumblers or tags with a roller accessory
- Home décor: custom shelves, labels, drawer pulls, and the occasional “artful cover-up of a scratch”
It’s the kind of tool that makes us think, “What else can we mark?” which is the beginning of a beautiful and slightly obsessive relationship.
Pros and Cons
We like being honest with ourselves, so here’s what stood out.
Pros:
- No PC required: The built-in AlgoOS 2.0 and touchscreen are genuinely useful.
- Beginner-friendly: Pre-installed projects, simple setup, multilingual support.
- Flexible connectivity: WiFi, Type-C, and SD card.
- Safety-conscious: Class 1 guard, auto-pause, tilt alert.
- Accessory support: Flat, roller, and jaws expand what we can do.
- Exhaust system: Removes smoke; optional purifier for indoor air.
- Removable honeycomb: Cleaner edges and larger-surface flexibility.
- LightBurn and LaserGRBL compatibility: Smooth upgrade path for power users.
- Great for engraving and thin cuts across many materials.
Cons:
- 3W cutting is limited: Not ideal for thick wood or heavy acrylic.
- Indoor use still benefits from the optional purifier or solid ventilation.
- Photos require more experimentation to nail consistent results.
- Work area limitations compared to large open-frame diode machines.
Material Guide: What We Engraved and Cut
To keep it practical, here’s how we’d think about materials:
- Wood (birch, basswood, bamboo): Engraves beautifully; cuts thin sheets with multiple passes.
- Leather: Engraves with high contrast; thin cuts are clean with slower speeds.
- Acrylic: Dark-colored acrylic engraves and cuts thin pieces; clear acrylic is challenging for diode wavelengths.
- Paper/Cardstock: Low power, high speed; watch for scorch. Great for intricate invitations.
- Fabrics: Felt and some cottons work; synthetics may melt—test first.
- Coated metal/Anodized aluminum: Engraves/marks very well; bare stainless may need marking spray.
- Rubber stamp material: Works, though ventilation is essential; the smell is determined to be memorable.
- Cork: Engraves nicely; can be crumbly, so use gentle settings.
We’re not going to pretend it can slice big plywood sheets. But for a craft studio or classroom, this spread covers a lot of fun and functional projects.

Settings, Tips, and Troubleshooting
We keep a small notebook (or a spreadsheet) with settings that worked for each material and thickness. It’s the closest we’ve come to feeling organized this year.
- Power and speed: Start conservative. For engraving, medium power and higher speed often produce clean lines. For cutting thin wood, lower speed and multiple passes beat one scorched pass.
- Airflow: Keep the exhaust running and leave the honeycomb beneath your work when possible.
- Masking tape: Use on wood to reduce scorch; peel gently after.
- Focus: If the beam is out of whack, details blur. Reset focus and test.
- Test grid: Burn a small array of squares at different powers/speeds. The best square becomes our setting.
Troubleshooting:
- Faint engravings: Increase power or reduce speed; check focus and lens cleanliness.
- Excessive charring: Lower power, increase speed, or add masking tape.
- Inconsistent lines: Ensure the material is flat, the piece is secured, and the honeycomb is clean of debris.
- Connection quirks: If WiFi feels stubborn, switch to SD or Type-C temporarily and update firmware when possible.
Built-In Exhaust and Optional Purifier
The built-in exhaust helps pull smoke away from the work surface. For indoor setups, we still prefer the optional smoke purifier, or at least a duct out a window. Wood smoke has that “campfire in the living room” vibe we love for exactly five minutes. The purifier captures particulates and tames smells, making the machine far friendlier in shared spaces.
We also clean the exhaust path regularly. Soot buildup can quietly subtract from performance, so a quick wipe every few sessions keeps things tidy.
Maintenance and Longevity
Like any precision tool, the AlgoLaser rewards small acts of care:
- Lens cleaning: A soft lens wipe every few jobs keeps detail sharp.
- Honeycomb maintenance: Brush off debris so airflow stays strong.
- Firmware updates: Tap “Update” when prompted; new features and fixes are worth it.
- Secure cables and connections: Tug nothing; treat it like the small appliance it is.
- Storage: Cover the machine when not in use to keep dust away.
Do that, and we’re set for a long run of projects.
Value and Who Should Buy It
We think the AlgoLaser 3W makes particular sense for:
- Beginners who want tight guardrails and quick success
- Craft sellers who engrave more than they cut thick stock
- Teachers who need safety features and a clear workflow
- Apartment makers who want compact gear and manageable smoke
If our primary goal is slicing dense materials daily, we’d consider a higher-watt diode or a CO2 laser. But if we want a compact, smart, genuine “switch on and make something” engraver, this checks the boxes and then some.
Frequently Asked Questions
Do we need a PC?
No. The built-in AlgoOS 2.0 and 3.5” touchscreen let us operate without a computer. For advanced control, we can connect LightBurn or LaserGRBL.
What materials can it engrave and cut?
It can engrave and cut a wide range of materials, including wood, leather, dark acrylic, paper, card, felt, and more. It can mark coated metals and anodized aluminum. Cutting is best on thin materials. Always test new materials and use proper ventilation.
Can it cut thick wood?
Not really. A 3W diode is suited to thin wood and multiple passes. For thick wood, consider a higher-power laser.
How do we connect files?
WiFi, Type-C, and SD card are all supported. It also supports OTA updates for firmware.
Does it support LightBurn?
Yes. It’s compatible with both LightBurn and LaserGRBL for flexible workflows.
How does the safety guard work?
Open the guard and the job pauses. Close it and the machine resumes. Tilt alerts trigger if the machine shifts, and it can handle minor issues autonomously.
Do we still need goggles if it’s Class 1?
Yes, we wear safety goggles—especially when the guard is open. Good habits are part of laser life.
What about smoke indoors?
The machine has built-in exhaust. For indoor use, we recommend the optional smoke purifier or an external vent to keep the air clean.
Is it beginner-friendly?
Definitely. No installation, a library of built-in projects, simple controls, and multilingual support make it ideal for first-timers.
A Day in the Life with AlgoLaser
We turn it on, it wakes politely, and we scroll through a few ideas. There’s a birthday gift that needs a monogram, a leather patch that wants a logo, and a teacher friend who hinted heavily about custom bookmarks. We load our file over WiFi, place a strip of masking tape on the wood, set the focus, and run a test square that looks perfect enough to show off.
The machine hums along, pulling smoke to the exhaust, while we tidy the desk and pretend the outcome was never in question. The engraving comes out sharp. We peel the tape, lightly sand the edges, and admire the result in a way that would embarrass us if anyone walked in. Then we queue up the next piece. It’s the rhythm we wanted: quick idea, quick setup, satisfying result.
What Surprised Us Most
- How rarely we needed to fight with software. The touchscreen and built-in OS made us feel comfortable right away.
- How much the honeycomb and exhaust improved cut quality compared to flat-table tests.
- How far we could go with a 3W laser when we used multiple passes smartly and focused carefully.
- How much time we saved by saving repeat jobs in the machine’s memory.
Why the Built-In OS Matters More Than It Sounds
We’ve used machines that rely on a PC tether, and they work—until the driver update collides with our operating system, or the laptop goes to sleep mid-job. With AlgoOS 2.0, the engraver becomes a true appliance. We can set up, run, pause, and resume without babysitting a computer, which simplifies everything from lesson plans to Etsy runs.
For us, this is what makes the AlgoLaser feel like a great gift—no assumption of software expertise, just a straightforward route from idea to object.
The Learning Curve, Kindly Sloped
We think a lot about the beginner experience because we live there often. The AlgoLaser gives quick wins with the built-in project library and then offers room to grow with LightBurn. When the machine automatically detects and fetches updates, we avoid the “did we brick it?” anxiety that still haunts our sleep from other gadgets.
Our Quick-Start Routine for New Owners
- Run a simple pre-installed design on scrap wood.
- Make a material test grid for wood, leather, and acrylic.
- Save a named preset after each good result.
- Try a custom SVG logo via SD card to validate the offline path.
- Add a roller accessory when we’re ready for tumblers or candles.
We promise, the first time we engrave a curved cup with a name perfectly centered, we’ll feel like we’ve unlocked a new level in life.
Edge Cases and Limitations We Noticed
Every tool has corners we bump into:
- Clear acrylic will make us question everything if we forget that diode lasers prefer dark, opaque surfaces.
- Thick plywood tests our patience; better to keep it thin or switch tools.
- Leather quality varies wildly; veg-tanned leather typically engraves more predictably than chrome-tanned.
- Photo engraving requires practice. Expect a few moody portraits of household objects before we get the hang of it.
These are normal realities, not deal breakers. We simply test, adjust, and eventually feel very wise.
Environmental and Space Considerations
We keep it on a sturdy table with decent airflow. The built-in exhaust helps, and the optional purifier earns its keep in winter when windows stay closed. If we share space with people or pets, we like having the guard and safety interlocks—no glowing laser beam staring into the room like a small sun.
Noise is modest—more of a fan hum than a construction zone. For apartment life, this feels fine, especially compared to certain other tools we love but can’t run after 9 p.m.
A Few Project Ideas to Jumpstart Creativity
- Housewarming: A set of bamboo coasters engraved with the new address or a map outline
- Weddings: Leather luggage tags with initials; cake toppers from thin wood
- Classroom: Geometry patterns on balsa; school logos on notebooks
- Pets: ID tags, treat jars with names, leash hooks labeled “Sit.”
- Holiday: Ornaments from thin wood or acrylic; gift tags that people keep
- Small business: Branded product tags, menu boards, shelf labels, or packaging stamps
These projects hit that nice zone where our effort-to-outcome ratio feels wildly in our favor.
The Intangible: Confidence and Craft
Every creative tool we keep ends up measured by how often we reach for it. With the AlgoLaser, we found ourselves saying “Why not?” more often. It’s accessible, predictable, and flexible. We can run it in ten minutes between other things, or sink an afternoon into a batch of custom gifts without thinking about firmware drivers or a laptop balancing act.
Is it the most powerful laser we’ve used? No. Is it the one we’d happily hand to a friend on their first day and know they’ll make something worth keeping? Absolutely.
Final Verdict
We like the AlgoLaser 3W Smart Laser Engraver because it lowers the barriers that usually slow people down. The built-in AlgoOS 2.0 system, 3.5-inch touchscreen, and OTA updates make it feel like a modern appliance rather than a science project. The Class 1 safety guard, auto-pause on opening, tilt alerts, and the option for smoke purification demonstrate a real respect for home and classroom environments.
The 3W laser is honest about its strengths: precision engraving, clean marking, and thin cutting across a wide range of materials. With flat, roller, and jaws accessories, plus compatibility with LightBurn and LaserGRBL, it handles far more than we expected from a compact machine.
If we want a reliable, beginner-friendly engraver that we’ll actually use—one that doesn’t demand a permanent workstation or a tangle of cables—the AlgoLaser 3W is a thoughtful choice. For small businesses, craft studios, classrooms, and gift-making marathons, it hits a sweet, practical spot. We keep finding reasons to turn it on, and the results look like we’ve known what we’re doing all along.
Disclosure: As an Amazon Associate, I earn from qualifying purchases.