Ever look at a plain wooden spoon and think, we could do better?


What Is the AlgoLaser 3W Mini Laser Engraver (T150 Pro)?
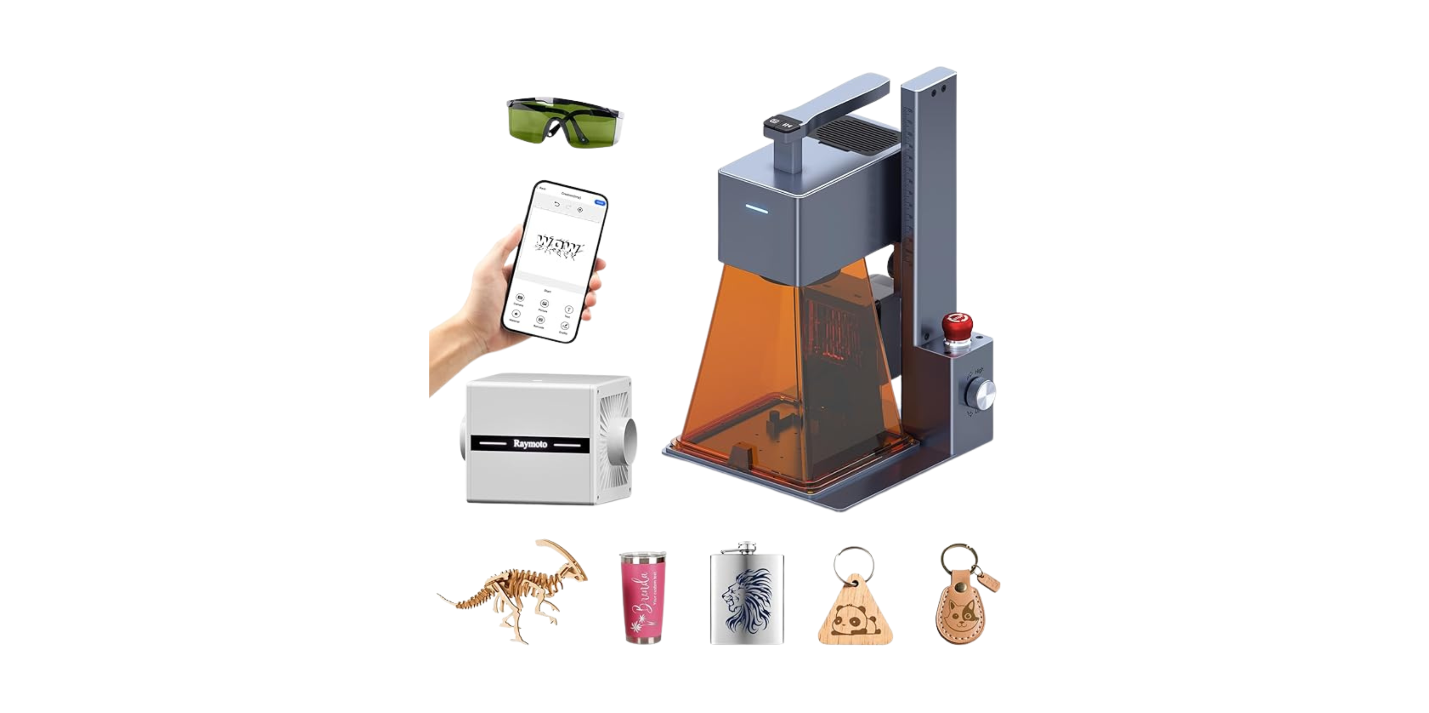
We’re talking about a compact, tank-style laser engraver that promises to sit on our desk without swallowing it whole. The AlgoLaser 3W Mini Laser Engraver, referred to as the T150 Pro in some materials, is built for beginners, hobbyists, and small-batch makers who want a stable machine that doesn’t require a forklift or a PhD. It comes with a 150×150mm workspace, speeds up to 8000mm/min, and safety features we wish our toaster had.
We’ve tested our share of desktop machines, and most of them tiptoe between “fun weekend project” and “why did we buy this?” This one aims to be both capable and friendly—the kind of studio companion we don’t mind introducing to our coffee mugs, leather notebook covers, or the occasional aluminum wallet.
Key Features at a Glance
Before we get into the sawdust and settings, here’s a quick breakdown of what we’re dealing with. Sometimes it’s easier to see it all in one place, like a menu for a restaurant that smells faintly of burnt pine.
| Feature | What It Means | Why We Care |
|---|---|---|
| 3W laser module | Diode laser suitable for engraving and light cutting | Great for detail work on wood, leather, acrylic, and marking metals |
| 150×150mm area | 5.9×5.9 inches of workspace | Big enough for coasters, tags, wallets, ornaments, and small batches |
| Up to 8000mm/min | High-speed motion capability | Faster jobs and smoother lines when tuned well |
| Tank-style design | Sturdy frame with low center of gravity | Less wobble, more precision, fewer jitters |
| 90% pre-assembled | Minimal setup out of the box | We’re engraving sooner, not building a robot |
| Tilt detection | Auto power-off if the machine shifts or tips | Safer in busy spaces and around curious hands |
| Clip-on risers | Quick height adjustment without tools | Engrave taller objects more easily |
| Software compatibility | Works with LightBurn, LaserGRBL, and mobile apps | Flexibility for different workflows and platforms |
| Rotary expansion | Optional rollers for cylindrical engraving | Mugs, pens, tumblers, and other roundish friends |
| Warranty & support | Responsive help and coverage | Peace of mind when we inevitably ask “Is this normal?” |

AlgoLaser 3W Mini Laser Engraver Machine - Portable Laser Engraver for Beginner & DIY,Tank-Style Design 8000mm/min High Speed & 150x150mm Engraving Area & Tilt Detection
$129.99 In Stock
Setup: From Box to First Burn
We value machines that respect our time and patience. The T150 Pro makes a promise right on the carton: we can go from unboxing to what smells like a campfire in minutes. It’s 90% pre-assembled, which seemed optimistic until we pulled it out and realized the remaining 10% was mostly our own doubting nature.
This is the kind of setup that rewards the impatient. We had the frame squared, cables clipped, and the laser snug where it belongs in under half an hour—including the part where we stared at it admiringly for five minutes.
Unboxing: What We Found
Inside the box, we found the engraver chassis, laser module, power supply, cables, a pair of safety glasses, basic tools, and some test materials. There’s a small selection of parts that felt familiar—Allen keys, clips, and the usual suspects—but the overall vibe was organized and intentional.
We’ve opened boxes that felt like a puzzle dumped on the floor. This felt more like a kit made by someone who also lives in a place with limited storage and an allergy to chaos. We appreciated that.
Assembly: 90% Done, 10% Satisfaction
Click, screw, route, done. That’s the general rhythm of getting the T150 Pro ready. The wiring is labeled sensibly, and the frame arrives pre-aligned, which is the part that really saves time. There’s always that moment when we wonder which way the laser should face, but the brackets make it obvious.
If we’re being honest, we like the little victory lap of turning something on and having it do a thing. This machine gave us that moment sooner than most. A quick check of the gantry motion, a loose cable tidied, and we were ready to claim we did “some light machine assembly” today.
Software Setup: LightBurn, LaserGRBL, Mobile
We installed LightBurn on a laptop and connected via USB in a matter of minutes. LaserGRBL also worked smoothly if we wanted a free tool and a straightforward path. The mobile app option felt like the lightweight, picnic version—handy for quick jobs, a bit limited for layering complex designs.
We were engraving text within a quarter of an hour, which is really what matters. Later, we moved to vector shapes and bitmaps, and the workflow remained sensible. It’s nice to have choices that don’t make us second-guess our operating system or our life choices.
Design and Build: Tank-Style Confidence
The tank-style design is not just a stylistic flourish—it stabilizes everything. When the motion system accelerates, the frame doesn’t shimmy. When we nudge the table (after being told not to), the machine sighs and keeps the lines straight.
We like that the design feels premium without being showy. It’s industrial-chic in a way that promises years of use, not six months of novelty. If we had tiny lounge chairs for tools we respect, this one would get a front-row seat.
Portability and Footprint
Being portable doesn’t always mean something is easy to live with. Sometimes it means we can move it but don’t want to. In this case, the T150 Pro is compact enough to live on a small desk or shelf, and light enough that we can move it without contemplating an assisted moving service.
For apartment creators, teachers, and small-shop folks, the footprint matters. We were able to keep it next to our cutting mat without making our space look like a crowded pop-up factory. It’s easy to set up, stash, and bring back like a favorite board game.
Clip-On Risers: Height Without Hassle
We were skeptical at first—an accessory that changes height in seconds usually means compromises. But the clip-on risers are solid and practical. They allow us to accommodate taller objects without rebuilding our setup, which means we’re more likely to try new things and less likely to stick to flat coasters forever.
We also appreciate not needing a tool just to move the laser up a few millimeters. The risers turn height adjustment from a chore into a shrug.
Performance: Speed, Precision, and Materials
Specs are one thing, and the smell of freshly engraved cedar is another. The T150 Pro is agile, and if we keep the settings sane and the focus correct, it lays down crisp lines with minimal fuss. The 8000mm/min figure is a maximum motion speed, and in practice we found ourselves running most engraving in the mid-range for better depth and consistency.
We like looking up mid-job and seeing clean, consistent strokes—not the jittery squiggles of a frame that’s trying to keep up with itself. This machine didn’t make us babysit, which is high praise.
Workspace: 150×150mm Sweet Spot
A 150×150mm workspace might sound modest, but in use it covers a surprising amount of our project universe. Coasters, phone stands, keychains, small plaques, name tags, leather patches, ornaments, and small signs all fit in the sweet spot.
When we wanted larger work, we split designs into tiles or made series-based projects—a set of four tiles that become a larger image is a neat way to work within the constraints without feeling constrained.
Speed: 8000mm/min in Real Use
There’s a time and place for speed, and mostly it’s when we’re doing lighter engravings with high contrast. For deeper, darker burns, we slowed down. The motion system held up well across a range of speeds, and we didn’t feel punished for pushing when the job allowed it.
In practice, the gains in speed meant we could run small batches without losing momentum (or interest). That’s crucial if we’re doing multiple wallet inserts or dozens of coasters for an event—our attention span thanked us.
How It Handles Materials
Not all materials behave the same under a 3W diode laser. Some glow, some smolder, some look at us like we’ve brought a spoon to a sword fight. Here’s how our tests shook out and what we learned along the way.
| Material | Typical Result | Our Notes |
|---|---|---|
| Wood (basswood, birch, cedar) | Excellent engraving, light cutting on thin sheets | Smooth lines; deeper burns with multiple passes; resinous woods can char |
| Plywood | Good engraving, careful on glue lines | Some layers scorch unpredictably; choose laser-safe plywood |
| Leather (vegetable-tanned) | Excellent engraving | High contrast; mask for cleaner edges; ventilate for odor |
| Acrylic (opaque/dark) | Good to excellent engraving | Opaque colors engrave best; transparent acrylic is much harder with a diode |
| Paper & cardstock | Excellent engraving and cutting | Fast, clean results; watch for scorching at corners |
| Anodized aluminum | Excellent marking | Crisp, bright marks without coating |
| Painted/coated metal | Good marking | Burns away coating for contrast |
| Bare stainless steel | Possible with marking spray/paste | Use a coating for permanent marks; test for contrast |
| Rubber (laser-safe) | Good engraving | Ideal for stamps; check for laser suitability |
We kept a small notebook of settings for favorite materials because repeatability matters when we’re doing work for others. We also used masking tape or transfer tape on wood to reduce soot and clean-up time. That small step made our results look more polished and made us feel like we knew what we were doing, which is a victory all by itself.
Safety: Tilt Detection and Sanity
If we had to choose between speed and safety, we’d choose safety and then go for speed anyway but with safety still very much in the corner. This machine’s tilt-detection is the kind of feature that we wish came on every moving object. If the machine shifts or tilts, it shuts the laser down automatically.
That gave us the confidence to use it in a shared space and on surfaces that weren’t as pristine as we’d like. It’s not permission to be careless—just a guardian angel we can actually see.
Ventilation, Goggles, and Common Sense
We’ll say this gently: make a habit of using proper ventilation and wearing laser safety glasses rated for the wavelength of the diode. Wood, leather, and plastics can produce fumes that are less than charming. A small fume extractor or a window fan arrangement helps.
We make it a policy to never leave the machine running unattended. It’s a laser. It makes heat. It’s okay to hover like a needy hawk while it works—think of it as a meditation exercise for people who don’t like meditation.
The Tilt Cut-Off: Our Unexpected Test
We didn’t plan to test tilt detection, but gravity is persuasive. We bumped the table while moving a chair, and the machine did what it was trained to do: it cut power to the laser instantly. The job paused, our heart rate spiked, and then we were grateful.
That one incident turned this from a nice spec into something we trusted. We started calling it the “oops switch” with respect and a little relief.
Workflow: From Idea to Finished Piece
Once we settled into a rhythm, the T150 Pro fit into our process as if it had been there all along. We’d sketch or import a design, tweak line weights, set a test square for power and speed, then run the job on scrap before burning the final piece.
It’s the kind of workflow that rewards us for being thoughtful for five minutes. We waste fewer materials and feel more like pros than tinkerers—even on days when we are absolutely tinkering.
Our Typical Process
- We open LightBurn and import or create the design.
- We set layers by function: vector outlines, fills, and marks each get their own color and settings.
- We run a tiny material test card to confirm speed/power if we haven’t used that material in a while.
- We check focus and height, often using the clip-on risers with odd objects.
- We hit start, watch the first minute like it’s a trailer for a movie we’re in, and then let it run while we prep the next piece.
This simple cadence keeps us consistent. The machine doesn’t need coddling, but it does appreciate a user who knows the difference between pine and walnut.
Engraving Cylindrical Objects with Rotary
With the rotary accessory, we added mugs, tumblers, pens, and rolling pins to our repertoire. Setup takes a little practice—especially getting the steps per rotation right—but once configured, it’s surprisingly reliable.
We found that simple horizontal designs and logos worked best, and we learned to position designs where hands don’t touch them constantly. That little shift turned “cool” into “durable and cool,” which we support.

Software Experience: LightBurn vs LaserGRBL vs Mobile App
Software is where we spend most of our time, so it matters. LightBurn gave us the balance of power and ease for complex vector work and image dithering. LaserGRBL’s simplicity is a relief when we just want to send something quick. The mobile app is fine for text, logos, and on-the-fly personalizations.
We like having all three. We use LightBurn for serious work, LaserGRBL for quick marks, and the app when we’re feeling casual or showing the machine to someone new without making it a whole thing.
Compatibility Snapshot
If you’re thinking about workflow or team members using different systems, here’s a quick view of what worked for us.
| Software | Platform | Best For | Our Impression |
|---|---|---|---|
| LightBurn | Windows, macOS, Linux | Full-featured design and control | Polished, reliable, worth it for regular use |
| LaserGRBL | Windows | Simple jobs, G-code control | Free, fast, easy to learn |
| Mobile Apps | iOS/Android | Quick engraving, text/logo | Convenient for simple jobs, not for complex layouts |
Use Cases: Hobby, Classroom, Side Hustle
We kept looking for the line where this machine stops being a beginner’s tool and starts being useful for small production. The truth is, it does both. For the right projects and materials, it can run small batches without complaint.
It’s also a good classroom companion. The tilt detection and compact design make it less intimidating, and the easy setup means less time fiddling and more time engraving bookmarks that say “Read This.”
For Hobbyists
For those of us who want to make custom gifts, labels, organizers, and décor, this is a sweet spot. We can engrave wood spoons, customize leather key fobs, make acrylic tags, create holiday ornaments, and ruin fewer raw materials learning how not to ruin raw materials.
It encourages experimentation without the pressure of managing a large machine. It’s like a friendly neighbor who knows how to use a soldering iron and offers to teach us without judgment.
For Teachers and Students
The combination of safety features, manageable workspace, and accessible software makes this a strong pick for classrooms or maker clubs. Projects can be quick, personal, and meaningful—bookmark nameplates, badges, small plaques, or signage.
We like the way it supports design thinking, iteration, and a touch of engineering. With adult supervision and proper safety protocols, it’s a solid educational tool.
For Small Shops and Makers
If we’re running a small shop or preparing for markets, the T150 Pro can handle personalization and small-batch runs for certain products. Coasters, dog tags, leather patches, wood ornaments, and marked aluminum cards are all realistic.
For heavy cutting or large signage, we’d want a more powerful laser with a bigger bed. But for adding a logo or custom text to products, this fits beautifully and pays for itself quickly if we put it to work.
Comparing Power: 3W vs Bigger Lasers
We won’t pretend 3W is the same as 10W or 40W—power matters. But so do detail, portability, and price. The 3W laser does intricate engraving well, especially on wood, leather, and coated metals. For cutting thicker materials, it’s not the right tool.
We like thinking of it as a precision pen rather than a utility knife. If that expectation is clear, we hold less resentment when it doesn’t gouge through 6mm plywood in one pass.
Where 3W Shines
- Fine detail on wood, leather, and anodized aluminum
- Clean text and logo engraving
- Lightweight cutting on thin woods, cardstock, and certain rubbers
- Compact jobs that reward placement and finesse
We found that using multiple passes for darker engraves kept edges crisp and avoided scorching. That patience shows up in the final product.
Where 3W Has Limits
- Cutting thicker materials quickly
- Transparent acrylic and certain light plastics with a diode laser
- Large-area jobs where a bigger workspace saves time
If our projects lean heavily on cutting thicker materials or larger signs, we’d pair this with a higher-power machine or a different laser type. But for engraving, it’s up to the task with less fuss.
Tips, Tricks, and Settings
We love machines that meet us halfway. The T150 Pro felt like a partner that doesn’t argue when we take notes and adjust settings. A few habits made our results consistently better and our mood consistently calmer.
Design Tips
- Use vector paths for clean lines and consistent engraving times.
- For photographs, test different dithering patterns and image contrasts in LightBurn.
- Group items into layers by purpose (marking, fill, outline) so we can tweak each quickly.
- Leave a small margin around designs to avoid edge charring on wood.
Two minutes of planning saves ten minutes of regret. We learned this the usual way.
Material Prep Tips
- Mask wood with transfer tape to reduce soot and clean-up.
- For leather, wipe with a damp cloth before engraving to reduce scorching and clean afterward with a leather-safe conditioner.
- Use marking spray on stainless steel if we want durable, high-contrast marks.
- Keep a test scrap of each material to record settings and results.
A little binder of test cards is more helpful than any memory we’ll ever have. We keep ours next to the machine like a cookbook.
Maintenance Tips
- Clean the lens regularly with lens wipes and avoid touching it with fingers.
- Check belt tension and wheel tightness monthly.
- Keep rails free of dust and debris; a soft brush works wonders.
- Update software when prompted; it’s not a conspiracy, it’s just helpful.
We set a calendar reminder and feel virtuous when it dings. The machine returns the favor with clean lines.
Troubleshooting and Support
No machine is perfect, and occasionally the T150 Pro asked us a question we had to answer. When we saw issues, they were usually solvable with a small adjustment and a calm spirit.
We appreciated that the manufacturer emphasizes support and warranty. When we sent a question about a calibration nuance, the response felt tailored rather than canned. We like humans who answer emails like humans.
Common Issues and Fixes
- Light banding in fills: Slow the speed slightly, add an extra pass, or adjust line interval.
- Inconsistent depth: Recheck focus height and ensure the material is flat and secure.
- Wavy text: Check belt tension and make sure the frame sits level.
- Weak marks on metal: Use coated or anodized surfaces, or apply marking spray for bare stainless.
Each of these took us from “why is this happening” to “oh, right” in a few minutes. The learning curve is real, but it’s not steep.
Warranty and After-Sales Experience
Warranty coverage and dedicated support are part of the package, and that matters—especially for first-time users. From setup guidance to troubleshooting, the support team seemed invested in keeping us making things instead of staring at a blinking light.
It’s reassuring. We want to spend our time creating, not waiting.
Pros and Cons
We like to be honest with ourselves before we talk friends into buying anything. Here’s our straightforward list.
Pros:
- Compact, stable tank-style frame that looks and feels sturdy
- 90% pre-assembled with a fast path to first engrave
- Up to 8000mm/min motion for quick jobs when settings allow
- 150×150mm area fits a surprising variety of projects
- Tilt detection and practical clip-on risers for safety and flexibility
- Compatible with LightBurn, LaserGRBL, and mobile apps
- Optional rotary for cylindrical objects
- Good support and warranty for peace of mind
Cons:
- 3W power is for engraving and light cutting, not thick cuts
- Transparent acrylic remains challenging for diode lasers
- Workspace limits larger single-piece projects
- Mobile app is best for simple tasks; complex work belongs on desktop software
We can live with these trade-offs, especially given the size and price point. Knowing what a tool is—and isn’t—keeps projects moving and expectations healthy.
Who Should Buy the AlgoLaser 3W Mini Laser Engraver
If we described this machine as a well-mannered partner for everyday engraving, we wouldn’t be far off. It’s ideal for people who want to get started quickly, hone craft skills, and produce small professional runs without the overhead of a larger system.
It’s also a great “second laser” for those of us who already own a bigger cutter but need a nimble engraving station that handles details and personalization without tying up the main machine.
If This Sounds Like You
- We want a desktop engraver that’s safe, stable, and quick to set up.
- We mostly engrave wood, leather, coated metals, and opaque acrylic.
- We value a small footprint and the ability to stash the machine when not in use.
- We plan to personalize products for gifts, events, or small sales.
- We like software flexibility and the option to add a rotary later.
It’s an approachable machine that keeps up with ambition as long as ambition isn’t measured in inches of plywood sliced per minute.
If You Need Something Else
- We routinely cut thick materials or need fast, deep cuts.
- We require a larger bed for single-piece signage or furniture-sized panels.
- We primarily work with transparent acrylic and plastics that diode lasers struggle with.
In those cases, we’d consider a higher-power laser or a different laser category entirely. This is not a failing; it’s simply using the right tool for the job.
Real-World Projects We Loved
The best way to judge a tool is by the things it helps us make. Here are a few projects that felt like love letters to this machine.
- Custom cedar coasters with a local map design: crisp lines, rich contrast, batch-friendly.
- Leather key fobs with initials: fast, personal, and the kind of gift people actually keep.
- Anodized aluminum wallets with monograms: sharp markings that look retail-ready.
- Rubber stamps for packaging: clean impressions after a bit of tuning and testing.
- Opaque acrylic tags for tool chests: legible, durable, and handsome in matte black.
Each project reinforced the value of speed with precision. We weren’t fighting the machine to get what we wanted; we were collaborating.
Safety and Workspace Etiquette
We know, we know—we already talked safety. But it bears repeating because we’ve seen enough enthusiastic makers put their laser next to a fern and a candle and call it a day.
Keep the area around the engraver clear, ventilated, and non-flammable. Secure materials so they don’t shift mid-job. Wear appropriate eye protection. And for goodness’ sake, never leave a running laser unattended. We can’t believe we have to say this, but we do: the plant doesn’t want to watch.
Why the Tank-Style Design Matters
Let’s linger for a moment on the machine’s tank-style frame. Stability isn’t just about feeling solid; it’s the foundation for clean, repeatable lines. When the head moves, the frame absorbs the motion instead of translating it into tiny errors across an hour-long job.
This matters most on detailed vector engravings and filled text where small vibrations show up as visual noise. We found ourselves trusting long jobs more, which is the difference between glancing at our watch and checking the work with a glass of something we earned.
Living With a 150×150mm Bed
We liked the bed size because it made us think in series and sets rather than giant canvases. We learned to arrange small objects smartly—four coasters at once instead of one, leather patches lined up with registration marks, and metal cards placed in a jig we made from scrap.
We also discovered that the limitation is more psychological than practical for the projects this laser is meant to handle. It’s big enough for 80% of our ideas and happy to repeat the rest.
The Hidden Value of Clip-On Risers
We didn’t expect to appreciate the risers this much, but we did. They turned odd-shaped items from “maybe another day” into “let’s do it now.” We engraved a shallow wooden box lid without removing the hinges and a thick notebook with a cover that would’ve otherwise been a balancing act.
That convenience encourages play, and play leads to better work. There’s a straight line from easy height adjustments to trying new materials, and from there to a small pile of gifts we can’t wait to give.
Batch Work Without Drama
We ran sets of items—coasters, tags, patches—and looked for hiccups. The machine’s motion system handled repeated jobs cleanly, and the consistent results made us comfortable accepting small orders from friends or customers without dreading the third set turning out slightly worse than the first.
With a simple jig and consistent settings, batch work felt civilized, not like counting stitches in a sweater our aunt made us out of obligation.
Lessons Learned the Pleasant Way
We’ve used machines that punish curiosity. This one mostly rewards it. We tried different wood species, changed line intervals, and experimented with image engravings. Tuning a photo of our dog into something that didn’t look like an abstract ghost took a few tries, but each iteration taught us something.
That learning loop is short and satisfying. We take notes, tweak a setting, and the next run is better. It feels like a machine designed to teach beginners without condescension and to serve veterans without boredom.
Environmental Notes
We’re not going to pretend engraving is a spa treatment for the air. Use a fume extractor or at least a box fan with a window setup to move smoke out. Choose materials responsibly—laser-safe rubber, low-resin woods, and quality plywood make a difference.
We also keep a small fire extinguisher nearby. It’s like carrying an umbrella: when we have one, it never rains.
Price-to-Pleasure Ratio
This is where the T150 Pro shines. For the cost and size, the creative return is high. That’s especially true if we put it to work for gifts or small batches. Personalized items have a habit of recouping costs quickly when friends and customers see them and ask, “Could you make one for me?”
We like tools that don’t make us justify them every time we look at the credit card bill. This one earns its keep.
Frequently Asked (By Us) Questions
We asked these in our heads; now we’ll answer them out loud.
- Can we cut thick wood? Not comfortably. Thin sheets, yes. Engraving is the star here.
- Will it engrave clear acrylic? Not reliably with a diode; opaque or dark acrylic is the way to go.
- Does speed matter as much as power? For engraving detail, yes; for cutting, power matters more.
- Is the mobile app enough? It’s enough for simple jobs, demos, and casual use. For serious work, use desktop software.
- How loud is it? Quieter than a vacuum, louder than a kitten. Mostly stepper motor hum and a fan.
We became the kind of people who answer our own questions with grace. We recommend it.
Final Verdict
We asked the AlgoLaser 3W Mini Laser Engraver to be a dependable desktop engraver that respects our space, our time, and our appetite for making things we can hold and hand to people. It said yes. The tank-style build brings stability, the 150×150mm workspace hits a sweet spot, and the 8000mm/min motion speed gives us room to be efficient without cutting corners.
The tilt detection is one of those safety features that changes our behavior for the better—we take more chances creatively because we trust the machine to take fewer chances physically. The clip-on risers remove a barrier to unusual objects. Software compatibility lets us work how we prefer.
Is it perfect? No. It won’t replace a higher-power machine for thick cuts or a larger bed for big projects. But as a compact engraver for beginners, hobbyists, classrooms, and small businesses, it’s a delight—approachable, reliable, and nicer to live with than a surprising number of appliances we own.
We wanted a tool that makes personalization easy and craftsmanship satisfying. We got one. And yes, our wooden spoon now has initials. It also has a tiny bear we engraved while we were supposed to be working on something else. We regret nothing.
Disclosure: As an Amazon Associate, I earn from qualifying purchases.