Have we ever wanted to sign our name in walnut, put our pet’s face on a coaster, or cut a tiny leather bookmark and feel like a wizard with a beam of light?


What the Longer Ray5 5.5W Mini Laser Engraver Is—and Why We Care
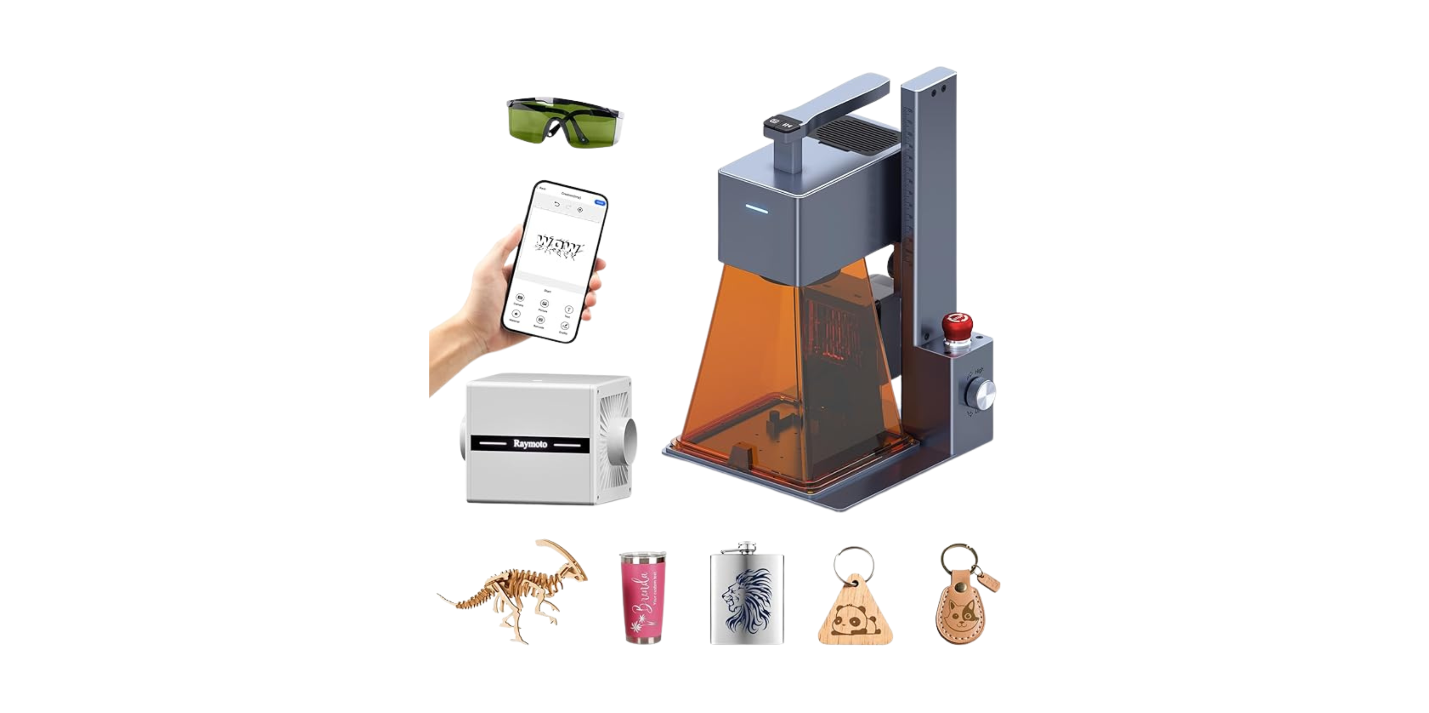
We’re looking at the Longer Ray5 5.5W Mini Laser Engraver, a compact, pre-assembled machine with a 130×130 mm working area, a 32-bit motherboard, and a top speed of 12,000 mm/min. It’s pitched to those of us who want accurate engraving without an engineering degree and who appreciate the idea of WiFi control and safety features that don’t feel like afterthoughts.
We don’t need a warehouse or a semester of training to get started. This little unit is meant to sit on a desk, cut and engrave with surprising finesse, and do it without the drama of complicated assembly.

Longer Ray5 5.5W Mini Laser Engraver, DIY CNC,High-Speed Laser Cutter up to 12000 mm/min, Engraving and Cutting Machine for Wood, Metal, Acrylic, Leather, 130×130 mm Working Area, Connection
Unboxing and First Impressions
We set it on the table and the first relief was immediate: it’s already assembled. There’s no puzzle of aluminum extrusions. No note that gently suggests we check twenty-three tiny connectors while pondering our life choices. The Ray5 Mini arrives as a single, sturdy piece.
From the look and feel, the build leans toward practical solidity rather than delicate elegance. The frame feels firm, the motion is smooth, and the focusing system—more on that soon—makes us feel like we might actually nail our first project instead of merely singeing it.
Setup: Fuss-Free, Sanity-Preserving
We plugged it in, connected to WiFi, and got to adjusting focus with the dovetail guide. There’s a humility to machines that do a few things exceptionally well. In our first hour with the Ray5 Mini, it gave us confidence—always a rare and wonderful gift from a tool with a laser.
If we’ve used a desktop printer or a vinyl cutter, we’ll feel right at home. If not, we’ll still be fine. The software connections are straightforward, the physical setup doesn’t involve wrench acrobatics, and the safety features are reassuring rather than nagging.
Pre-assembled One-Piece Design
We appreciate the one-piece build more than we expected. It means alignment from the factory, fewer rattling points, and fewer places for us to make innocent mistakes. That translates into quicker, cleaner results.
Pre-assembled doesn’t mean disposable; the Ray5 Mini’s frame and rails look serviceable, and it’s clear the machine is designed for the long haul with occasional tune-ups rather than constant fussing.
Dovetail Guide Focusing System
The dovetail focusing system lets us adjust height without squinting or trying to hold a ruler while an impatient laser waits. This matters because proper focus is absolutely everything. The Ray5 claims a 0.08 mm spot size, and we can’t enjoy that precision if our surface sits at the wrong height.
The dovetail mechanism glides reliably. We set it, lock it, and the spot remains crisp. The difference in edge sharpness when properly focused is immediately visible, even with basic text.
Speed, Power, and That Sweet 0.08 mm Spot
The engineering magic here is the compressed laser spot, which becomes the difference between fuzzy photo engravings and crisp ones. The 5.5W optical power sounds modest compared with big CO2 machines, but for a diode this compact, it’s quite capable—especially when the beam is well shaped.
On sample projects—coasters, leather tags, anodized aluminum business cards—we get consistent, fine detail with thin line art and small text. With the right material, it feels like writing with light.
What 12,000 mm/min Means in Real Life
Yes, the Ray5 Mini can zip at 12,000 mm/min. But speed is only as useful as the material and design allow. For shallow surface marking or light engravings on softer woods, that speed creates a fast workflow. For deeper engravings, denser hardwoods, and cutting, we slow down.
We think of it like a sports car with good brakes: capable of speed, but not obligated. Even at more conservative rates, the throughput feels snappy.
The 0.08 mm Laser Spot and Why It Matters
That tiny spot is what makes delicate textures, hairline strokes, and photo engravings shine. In practice, smaller spot size means:
- More detailed engraving with less charring
- Cleaner, narrower cuts that don’t overheat the material
- Better results at slightly higher speeds because power density is focused
We noticed sharp corners on letters that otherwise tend to round off on cheaper diodes, especially in small fonts. The precision also makes it easier to repeat jobs without drift in alignment.
Cutting and Engraving: What We Can Expect on Different Materials
We’re often asked what a 5.5W diode can actually cut. The answer: thinner wood, some acrylics, leather, cardboard, and certain fabrics. It engraves a lot more than it cuts. Metals? It will engrave anodized aluminum beautifully and mark coated metals. Bare stainless steel requires marking spray. Cutting metal is not in the cards, and that’s normal for this class of diode.
Typical real-world expectations:
- Wood: Clean engravings; cuts 2–3 mm basswood in 1–3 passes, up to ~5–6 mm with more passes
- Acrylic: Opaque/black acrylic cuts; clear acrylic does not (blue diode light passes through)
- Leather: Excellent for engraving, cutting thin veg-tan with care
- Coated metals: Engraves coatings very cleanly, exposing the metal
- Paper/cardboard: Easy, but manage heat to avoid unwanted scorch
With smart settings and a little finesse, this small machine produces professional-looking results. The working area is compact, so we’re naturally oriented toward coasters, tags, ornaments, small signage, and gifts.
Software and Workflow: Easy, Flexible, and Familiar
Compatibility with LaserGRBL (Windows) and LightBurn (cross-platform, paid) is a win. We also get onboard wireless with app control, which makes quick jobs surprisingly pleasant. If we’re new to the scene, it’s nice to have options that don’t lock us into a single ecosystem.
We used LightBurn for more complex designs and LaserGRBL for quick engravings. The mobile app is handy when we don’t feel like dragging a laptop around.
LaserGRBL and LightBurn
LaserGRBL is free, popular, and more than capable for basic tasks. LightBurn costs a bit, but it’s the gold standard for control and layout. It streamlines alignment, layers, and parameter testing.
Switching between the two isn’t a problem; the Ray5 Mini speaks standard G-code dialects and feels very predictable once we get used to its motion and acceleration.
Wireless and App Control
The built-in WiFi connection lets us send jobs, tweak settings, and monitor progress from our phone. While we still prefer a computer for complex vector layouts, the app is great for:
- Simple engravings (logos, names, quick personalization)
- Monitoring job status while we stand nearby
- Making incremental adjustments without a cable jungle
It’s not a toy feature. It shortens our “idea to action” time, which is often the difference between starting a project and letting it languish as a note in our phone.
Offline Engraving
Being able to run jobs without a live computer connection is ideal for workshops and classrooms. We save the file, set it up, and let it run while we watch—and we do watch, because it’s still a laser capable of fire, and it deserves our attention.
Safety That Feels Like Common Sense
The Ray5 Mini includes an emergency stop button, an eye-protection shroud around the laser head, and a flame sensor. We like knowing we have those tools before we ever put plywood under the beam.
Safety isn’t glamorous, but it’s the most important feature. We also recommend using proper laser safety goggles designed for the 455 nm wavelength and ensuring ventilation.
Emergency Stop, Eye Protection, and Flame Sensor
- Emergency stop: Big, obvious, and instant. We hope to never need it, but we’re relieved it’s there.
- Eye-protection shroud: It shields from direct line-of-sight glare. It’s helpful but not a substitute for goggles.
- Flame sensor: If it detects a flame, the machine can stop. The sensor is our second safety net after our own attention and ventilation.
We still supervise every job. Thin materials and high power can sometimes turn into a little campfire if we’re not careful.
Working Area: 130×130 mm, Small but Capable
If we think of the Ray5 Mini as the “laser sketchbook,” the 130×130 mm area makes perfect sense. It’s ideal for coasters, jewelry, bookmarks, wallet inserts, dog tags, small signage, and décor accents.
For bigger designs, we can tile projects or reset the origin to move along. It’s not as fast as a large-bed laser, but it’s doable. And for businesses selling small personalized goods, this footprint fits neatly into a corner of a craft room or office.
Practical Constraints and Clever Workarounds
- Batch jigs: Create simple jigs to line up multiples. We engrave six coasters, swap them, repeat.
- Tiling: Divide a long graphic into sections and align carefully.
- Pre-cut blanks: Use store-bought blanks sized to the bed to avoid positioning headaches.
We also recommend keeping a few squares of scrap wood in the same thickness as our projects. We use them to dial in focus and test power/speed before risking the real thing.
A Day in the Life: Our First Projects
We began with a simple bamboo coaster, an old family recipe scanned as a bitmap, and a hopeful sense of optimism. The fine strokes came through better than expected. We tried a second pass at lower speed for contrast and learned that restraint matters; too many passes can bloom the edges.
Next, we cut a tiny leather tag. The smell drifted toward “antique boot,” so we opened a window and turned on a fan. The cut was crisp. In our third project, we engraved an anodized aluminum card with micro text. The Ray5 Mini handled 6 pt letters without turning them into blurry dots.
The short version: if we prepare the art well, the Ray5 Mini meets us halfway with precision.
Maintenance and Longevity
There’s not much to do, but what there is matters. A clean machine is a happy machine, and a happy machine gives us better engravings.
- Clean the lens: Dust and smoke residue accumulate fast. We gently clean the lens with the appropriate swabs.
- Check belts and wheels: A slight tension adjustment can stop wobbly lines.
- Keep rails clear: Debris on the rails leads to bumps; bumps lead to ruined projects.
- Ventilation: Soot buildup near the beam path can defocus the laser; ventilation helps prevent that.
If we add an air assist (an optional accessory), we’ll reduce scorching and improve cut quality. It’s not included by default, but a modest air pump aimed near the kerf can dramatically improve cuts in wood and acrylic.

Noise, Smell, and Ventilation
The machine itself is relatively quiet, aside from stepper motion and the occasional fan. The smell is where we pay attention. Wood smells like a campfire. Leather smells like something our grandmother might have forgotten in the attic. Acrylic smells sharp and unfriendly.
Ventilation isn’t optional. We point an exhaust fan out the window or use an enclosure with filtration. It’s good for us, good for our housemates, and good for the life of the machine.
Specs and Capabilities at a Glance
| Category | Details |
|---|---|
| Product | Longer Ray5 5.5W Mini Laser Engraver |
| Laser Power | 5.5W (diode, with compression) |
| Laser Spot | ~0.08 mm (ultra-fine) |
| Motherboard | 32-bit |
| Maximum Speed | Up to 12,000 mm/min |
| Working Area | 130 × 130 mm |
| Focusing | Dovetail guide system |
| Software | LaserGRBL, LightBurn |
| Connectivity | USB, built-in WiFi, app control; supports offline engraving |
| Safety Features | Emergency stop, eye-protection shroud, flame sensor |
| Supported Materials (Engrave) | Wood, leather, paper, cardboard, acrylic, anodized aluminum, coated metals, slate, painted surfaces |
| Supported Materials (Cut) | Thin wood (e.g., basswood), leather, cardboard, opaque/black acrylic (not clear), select fabrics |
| Not Supported | Cutting metal; cutting clear or white acrylic |
| Ideal Uses | Coasters, tags, jewelry, ornaments, small signage, custom gifts |
This breakdown captures what we can count on. The Ray5 Mini won’t replace a big CO2 machine for thick acrylic or plywood, but it’s excellent for compact projects and fast personalization.
Accuracy: Getting Crisp Results Every Time
We get the best results when we respect the trifecta of focus, speed, and power. A small spot size only shines if the focus is on point and the material stays still.
- Focus test: Use a ramp test or the included focus procedure and mark the sweet spot.
- Speed/power chart: Keep a cheat sheet for our favorite materials. We learned more in two hours of testing than we would from a dozen forum posts.
- Securing work: Use honeycomb or a sacrificial board with magnets or clips. Movement ruins sharpness.
For photo engravings, we convert images with careful dithering. LightBurn and LaserGRBL both offer image modes that translate shades into dot patterns the laser can render with surprising nuance.
Pros and Cons: What We’re Loving and What We Notice
We like tools that apologize for our mistakes by being forgiving. The Ray5 Mini has that energy. It’s powerful enough for real work, compact enough to live on a desk, and equipped with features we actually use.
Pros:
- Pre-assembled and stable: up and running quickly
- 0.08 mm spot size yields stellar detail
- 12,000 mm/min top speed for light, fast jobs
- WiFi/app control is genuinely useful
- Works with LaserGRBL and LightBurn
- Safety features that matter; offline engraving support
- Great for small business personalization
Cons:
- 130×130 mm area limits big projects
- 5.5W diode won’t cut thick material or any metal
- Clear acrylic is a no-go
- Ventilation setup is on us (as with most lasers)
- App control is better for simple tasks than complex designs
We’d rather have an honest small machine than an overpromised one. The Ray5 Mini is upfront about its strengths and boundaries.
Who It’s For
- Makers with limited space who want professional-looking results
- Etsy sellers and small brands doing custom coasters, tags, and small signage
- Teachers and workshop leaders who value safety features and simple setup
- Hobbyists who want a stress-free entry into laser engraving
- Anyone who wants crisp photo engravings on wood and anodized aluminum without a large investment
If we routinely need to cut 10 mm plywood or fabricate large panels, we’ll want a more powerful or larger machine. But for small, beautiful things? This is a sweet spot.
The WiFi Difference: Convenience We Actually Use
We’ve met WiFi features in the wild that seemed designed to make us miss USB cables. This isn’t that. With the Ray5 Mini, we load a simple graphic, set parameters, and press go—from a couch adjacent to the workshop, checking in like an anxious chaperone. It cuts down on the friction of “I’ll do it later.”
We still draft our complex designs on a laptop, but for quick text or logos, the mobile control is a time saver.
Cutting and Engraving Recipes We Found Effective
Every material demands its own recipe. Here are starting points we found helpful. We adjust based on desired depth and our specific stock.
- Basswood (2–3 mm): Engrave at 3000–6000 mm/min, 30–50% power. Cut at 300–600 mm/min, 80–100% power, 2–4 passes.
- Birch plywood (3 mm): Engrave at 2000–4000 mm/min, 35–60% power. Cut at 200–400 mm/min, 100% power, multiple passes; consider air assist.
- Opaque/black acrylic (2–3 mm): Engrave at 3000–6000 mm/min, 20–40% power. Cut at 200–400 mm/min, 100% power, several passes; air assist helps.
- Leather (1–2 mm veg-tan): Engrave at 4000–8000 mm/min, 15–35% power. Cut at 600–1000 mm/min, 60–90% power, 1–2 passes.
- Anodized aluminum: Engrave at 6000–10,000 mm/min, 20–40% power.
- Stainless steel (with marking spray): Engrave at 1000–3000 mm/min, 80–100% power.
These are starting points, not commandments. Wood varies, and so do our tastes. We keep a drawer of test chips with notes; it’s the most valuable library card we own.
Tiling, Jigs, and Getting More from a Small Bed
Tiling is the polite workaround for bigger designs. We segment a long piece into 120 mm increments, use alignment marks, and step through the project. It’s not quick, but the results are satisfying. We also make simple jigs: a right-angle fence cut from plywood that sits on the bed, giving us a repeatable origin for batches.
If we’re producing sets—company logos on a dozen coasters—we print a cardboard template with holes that match coaster size, tape it down, and set our origin accordingly. Swap blanks in and out, repeat the job, and magically become efficient.
The Case for Air Assist
Even though it’s optional, air assist deserves a mention. A gentle stream of air at the cut line:
- Clears smoke, helping the beam reach the material
- Reduces char and improves edge quality
- Prevents small flare-ups
- Helps acrylic cuts look cleaner
A small aquarium pump and a 3D-printed nozzle (or an aftermarket kit) can make a 5.5W diode feel like it got a quiet upgrade.
Quality-of-Life Tips We Wish We’d Known on Day One
- Marker trick: Draw a small dot on the material at our desired origin, jog the laser to the dot, and frame from there.
- Framing pass: Always frame the job; it saves materials and our feelings.
- Gray-scale images: Experiment with dithering patterns; Stucki and Jarvis often yield better tonal gradients on wood.
- Masking tape: Apply blue painter’s tape to wood before engraving for cleaner edges; peel to reveal crisp graphics.
- Focus gauge: Keep a printed focus test card nearby. We don’t trust our eyes on focus alone.
- Quality blanks: Avoid wood full of voids and glue pockets; they turn engraving into an archaeological expedition.
Small habits produce big improvements, especially with a compact machine that rewards precision.

How It Stacks Up Against Alternatives
If we compare this to other 5–10W diode engravers:
- xTool D1 (5W/10W): Larger working area and a robust frame; higher cost if similarly outfitted. The Ray5 Mini wins on compactness and out-of-box simplicity.
- Ortur Laser Master series: Strong community and accessories; typically more assembly and size. The Ray5 Mini’s one-piece build is less intimidating.
- Atomstack A-series: Comparable in power; feature sets vary. The Ray5 Mini’s WiFi and safety combination feels thoughtfully integrated.
The Ray5 5.5W Mini doesn’t pretend to be the biggest or the most muscular. It aims for a sweet niche: accurate, compact, friendly, and ready to work.
Reliability and Repeatability
After running multiple batches, we notice consistent alignment and stability. The 32-bit board keeps motion smooth, and the machine doesn’t stutter on complex paths. Belts stayed true, the carriage kept parallel, and repeat jobs hit the same marks pass after pass.
For makers selling small goods, repeatability is the line between fun hobby and reliable business. The Ray5 Mini feels dependable in that way.
The Engraving That Surprised Us Most
We took a black-and-white photo of a beloved cat who gives us “judging you from the sofa” energy. On basswood, with dithering tuned and focus perfect, the whiskers came through. Not “is that fur or a smudge” but actual whiskers, with stubble-level nuance.
That’s where the 0.08 mm spot earns its keep. The detail isn’t just marketing copy; we can see it in the work.
A Few Boundary Conditions Worth Remembering
- Don’t use PVC. Ever. It releases corrosive, toxic gas. Check material composition first.
- No clear acrylic cutting with blue diodes. It’s science, not stubbornness.
- Watch for flare-ups on cardboard and thin woods. Never leave the machine unattended.
- Eye protection is not optional. The shroud helps but doesn’t replace proper goggles.
These aren’t scoldings; they are guardrails so our projects remain inspiring and our lungs remain on speaking terms with us.
When to Choose a Bigger or More Powerful Laser
If we routinely cut thick hardwoods, large signs, or want to cut clear acrylic, we’ll want a CO2 laser or a higher-power diode with a larger bed. But those choices come with size, cost, and maintenance. The Ray5 Mini’s charm is that it fits in our life without rearranging furniture or budgets.
We think of it as the perfect second machine for experienced makers, or the perfect first machine for cautious optimists who appreciate craft and detail.
Support, Community, and Learning Curve
We found setup guides and community posts that walk through common starting points. Because the Ray5 Mini is compatible with popular software, we also benefit from the larger ecosystem’s tutorials and G-code wisdom. The learning curve is mostly about materials and technique, not the machine fighting us.
The first week is the most fun: things smell smoky, our test chips pile up, and suddenly friends ask if we can personalize everything they own.
Workflow We Keep Coming Back To
Our routine became:
- Design in LightBurn (text and vector art)
- Test engraving on scrap at low power to check alignment
- Run a small test swatch to confirm speed/power
- Hit go and hover nearby with a spray bottle and a fan running
- Tweak settings and jot down notes for next time
It’s the quiet ritual of making: a little measurement, a little smoke, a lot of quick wins.
Price-to-Performance Judgment
Considering the speed, the spot size, the WiFi, and the build, the Ray5 Mini’s value lives in the “practically useful” category. It punches above its size for engraving quality, and the pre-assembled chassis means we spend time creating instead of debugging.
We’ve seen pricier machines deliver not much more precision. We’ve also seen cheaper ones make us pay with hours of frustration.
The Wish List
- Built-in air assist as an official accessory option
- A bundled exhaust solution for apartment-friendly use
- A slightly larger working area while keeping the one-piece chassis
- Quick-release z-height with a tactile click-stop for common material thicknesses
None of these are deal-breakers; they’re just the “what if” thoughts that float in as we work.
Results That Sell: Small Business Use
If we’re making coasters, pet tags, key fobs, or small plaques, the Ray5 Mini handles production volumes better than its footprint suggests. We make a jig, lay out multiples, and repeat until we hear the tiny applause of finished pieces landing in a tray.
Branding wood boxes with a logo? Engraving serial numbers on anodized aluminum parts? Creating giftable ornaments in seasonal batches? It’s absolutely in the zone for all that.
Environmental and Material Considerations
We reuse offcuts and keep a stock of blanks in popular sizes. We also choose woods with fewer glues (like basswood) when possible. If we’re mindful about extraction and filtration, we’ll keep both our workspace and conscience a little clearer.
Leather offcuts from local shops are inexpensive and make terrific personalized gifts. Slate coasters engrave crisply and look startlingly upscale for the cost.
The Long Game: Will We Outgrow It?
We might. That’s not a bad thing. It might be the machine that teaches us what we love making, and then we decide to scale. But it’s also very possible we keep it for precision engraving even after we get something bigger for heavy cutting. The 0.08 mm spot makes it relevant for fine detail projects long after we expand.
Clean Cuts, Clean Conscience: Fire Safety
We keep a metal tray or tile under our work area. We place a small fire extinguisher within arm’s reach. We keep a spray bottle by the machine for quick suppression of tiny flares. We don’t leave the room while it runs. It’s common sense that feels heroic later when nothing catches fire.
The Ray5 Mini’s flame sensor is an ally, not a substitute for us being there.
Final Tweaks That Made a Difference
- Elevate material slightly on standoffs to improve airflow during cutting
- Use a honeycomb or perforated metal sheet as a base to reduce backside scorching
- Create a parameter library in LightBurn for our common materials
- Name our jigs and store them flat so we can grab and go for repeat jobs
Small efficiencies make this compact machine feel downright industrious.
Our Verdict on the Longer Ray5 5.5W Mini Laser Engraver
We admire tools that respect our time. The Longer Ray5 5.5W Mini feels like it was designed by people who asked, “What if we just made the first week easy?” Pre-assembled, focused on precision, fast when it can be, careful when it needs to be, and honest about what it can’t cut.
If we want a compact engraver that produces crisp detail on wood, leather, acrylic, and coated metals—while giving us WiFi convenience, safety features, and compatibility with the best software—the Ray5 Mini is an easy recommendation. It’s not for cutting thick materials or doing giant projects, but for the hand-sized, giftable, sellable things we love to make, it’s dependable, friendly, and quietly impressive.
We started with a coaster and a cat, and we ended up with a small stack of shop-worn sample chips that feel like treasure. This little machine turns ideas into objects with the gentle authority of a tool that knows what it’s about—a beam of blue light, a bed the size of a notepad, and a willingness to work with us as we figure out how to turn personal into permanent.
Disclosure: As an Amazon Associate, I earn from qualifying purchases.